Repository navigation
Controls
English · Deutsch · Español · Français · Italiano · 日本語 · 한국어 · Polski · Português (Brasil) · Русский · Türkçe · 简体中文 · 繁體中文 · Български · Magyar · Norsk · Українська · Tiếng Việt · العربية · فارسی · ไทย
Smart! controls are available in Options > Keybindings > "Smart! Mod Controls", so you can rebind them. (Smart! Camera's keys are in the adjacent "Smart! Camera Controls" section.)
| Feature | Smart Panel | World controls and feedback |
|---|---|---|
| Grid and transforms | K → Scaling: direct counts, spacing, steps, stagger and rotation | Modifier + wheel or numpad; HUD shows current target and value |
| Auto-Connect | Applicable connection section; U opens connection settings on supported buildables |
Generated routes and flow arrows appear in the preview; normal build-gun fire constructs them |
| Extend | K → Extend → Select Source; source summary, direction and placement controls | Matching-source hover remains a shortcut; unmodified wheel cycles direction; scaling controls repeat the module |
| Walking | K → Walking: segment, route and connection controls | Steer using the documented Walking controls; HUD reports the active segment and route |
| Upgrade | K → Upgrade: Radius/Network, target, scan, tiers and material review | Network's Select Target temporarily accepts one world click; HUD is not an upgrade form |
| Restore | K → Restore: Grid Presets and Modules | After loading, adjust the preview with scaling controls; U + Num 9/3 cycles recent restores |
| HUD/Camera layout |
F8 opens layout editing |
Drag/resize while unlocked; Done / Lock commits; Camera mode/zoom also have their own keys |
Only controls applicable to the held buildable are offered. The HUD is live feedback, not another direct-entry panel. Defaults below can be rebound; see each feature page for its workflow and restrictions.
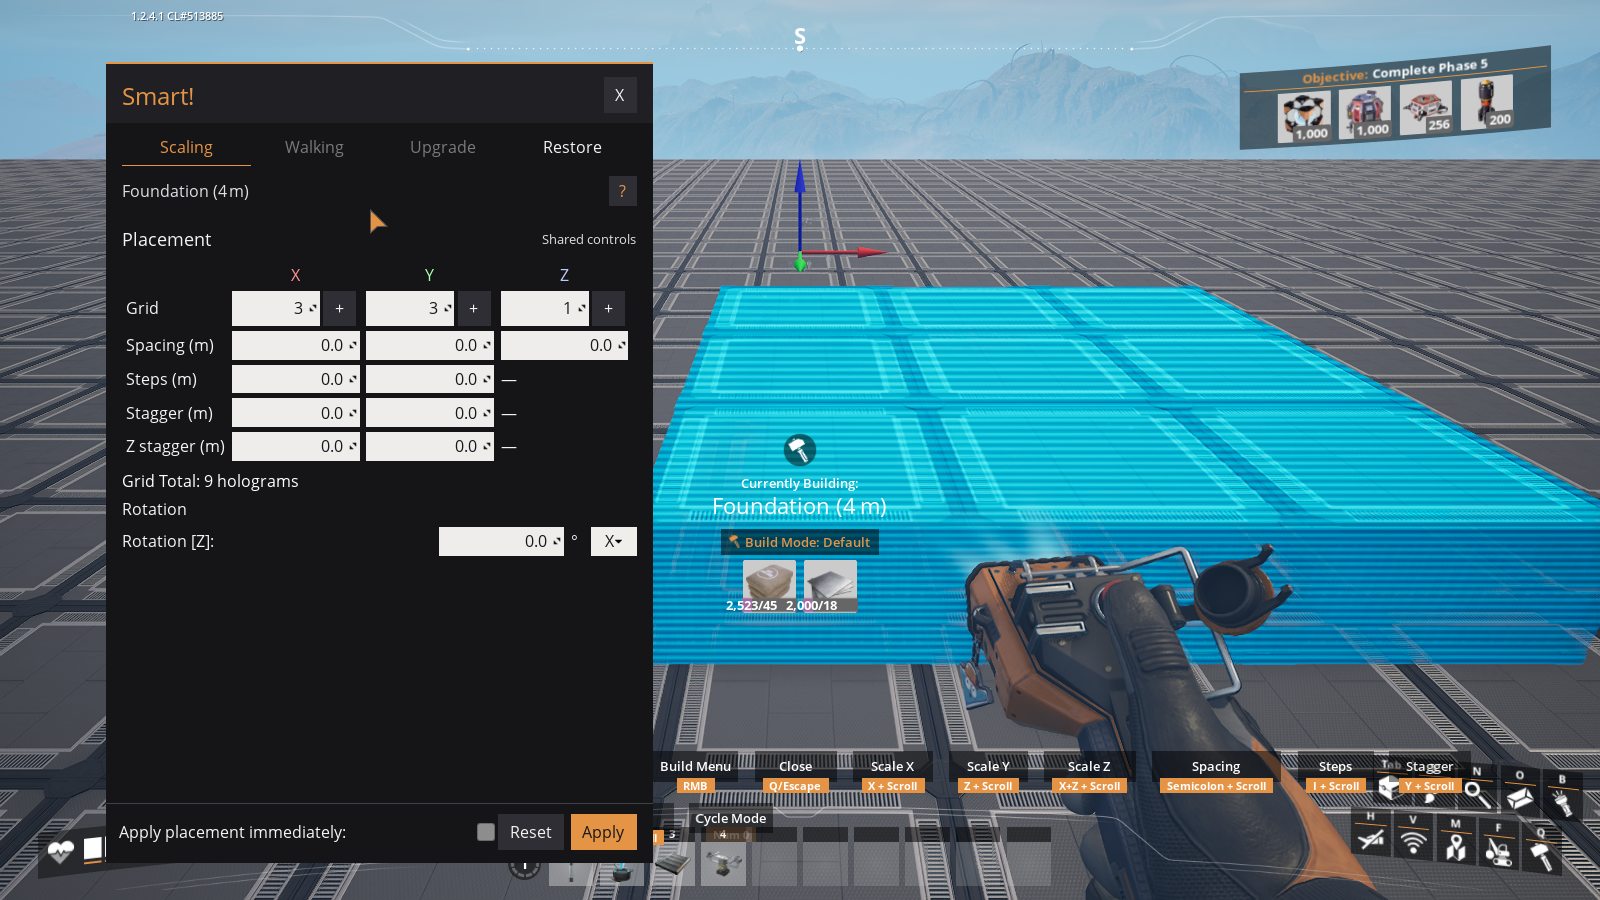
The Panel provides direct value entry; wheel and keyboard controls adjust the same placement, with the HUD providing feedback.
| Key | What it does |
|---|---|
K |
Open or close the shared Scaling / Extend / Walking / Upgrade / Restore window |
F8 |
Edit HUD layout; with Smart Camera installed, edit HUD and camera layouts together |
Num Decimal |
Toggle Smart building assistance for this session |
Num 8 |
Increase the active value |
Num 5 |
Decrease the active value |
Num 6 |
Increase Y grid count |
Num 4 |
Decrease Y grid count |
Num 9 |
Increase Z grid count |
Num 3 |
Decrease Z grid count |
X |
Hold to adjust X with the shared controls or mouse wheel |
Z |
Hold to adjust Y with the shared controls or mouse wheel |
X + Z |
Hold both to adjust Z with the shared controls or mouse wheel |
; |
Hold Spacing mode |
I |
Hold Steps mode |
Y |
Hold Stagger mode |
, |
Hold Rotation mode |
Num 0 |
Cycle the active mode's axis |
U |
Recipe selection on production buildings; connection settings or sign supports on applicable buildables |
Num 1 |
Toggle direction arrows |
Mouse Wheel |
Adjust the active Smart mode, or vanilla rotate when no Smart mode is active |
Press Num Decimal to toggle Smart building assistance for your current session. Disabling cancels the active Smart preview. Select a recipe again to place normally, including vanilla blueprints too large for a Smart placement. Press the same key to re-enable assistance.
Your saved mod settings stay intact. The choice survives recipe changes and holstering, and each multiplayer player controls their own assistance. Rebind Toggle Smart (Session) in Options if your keyboard has no numpad. This is separate from the double-tap Num 0 shortcut below.
See Smart Assistance for the full workflow.
When you are just scaling a grid:
-
Num 8/Num 5changes X. -
Num 6/Num 4changes Y. -
Num 9/Num 3changes Z.
For mouse wheel scaling, hold X, Z, or both.
Some keys are held to temporarily change what the increase/decrease controls do.
| Hold | Mode | Use it for |
|---|---|---|
; |
Spacing | Adding or removing gaps |
I |
Steps | Raising each row or column |
Y |
Stagger | Offsetting rows or layers |
, |
Rotation | Making a horizontal arc |
U |
Recipe | Choosing or clearing a recipe |
While holding one of these modes, use Num 8, Num 5, or mouse wheel to adjust the value. Press Num 0 — or quickly re-tap the mode key you're holding — to switch which axis the mode is editing, without reaching for the numpad.
Stagger has four patterns, grouped into two families:
- Stack — a vertical pile that leans as it rises.
- Flat — a row that drifts sideways as it runs.
Num 0 toggles between Stack and Flat, re-tapping the Stagger key (Y) switches the direction within the family, and Num 9 / Num 3 jump straight to Stack or Flat.
Turn on Player Relative Controls in the mod settings (Building Behavior) and building follows the direction you're looking instead of fixed compass axes:
- The mouse wheel grows the build toward wherever you're facing.
- The numpad becomes a compass:
Num 8/Num 5away from and toward you,Num 6/Num 4to your right and left,Num 9/Num 3up and down. - While you hold a transform mode, the HUD names what the wheel is driving — Forward, Lateral, or Vertical — and a quick re-tap of the mode key switches between them.
It's off by default, so your classic controls are unchanged until you switch it on. The Smart Panel always stays on fixed X/Y/Z.
For vertical Pipeline/Hypertube wall runs with Player Relative enabled, X+Z + wheel scales vertically and Z + wheel scales sideways. The Panel continues to expose building X/Y/Z; arrows show the rotated directions. Native pillar controls similarly follow the accepted tilted frame.
Walking uses segment-relative controls for advance, lanes, levels, turn, rise and shift. Player Relative does not remap those route meanings. Start or resume a conduit bus by holding its matching stackable support, not the pipe/belt recipe itself. See Smart Walking.
Camera defaults: [ cycles building angles, ] + wheel adjusts distance, and F8 enters/exits layout editing. Each action can be rebound. Outside Edit Mode, overlays do not intercept placement clicks. Cameras supplied with absolute world poses use their supplying mod's aiming controls rather than the building-angle keys.
Hold U and press Num 9 to step through the Smart Restore presets you've applied this session (newest first), or Num 3 to step back. Each one arms just like pressing Apply in the Smart Panel — so placing the same restore over and over is just aim, click, U + Num 9, aim, click.
Double-tapping Num 0 with no mode key held toggles Smart Auto-Connect and Extend for the current session. This is useful when Smart! is trying to help but you want one normal placement.
Last updated: 2026-10-22 · Smart! v35.0.0 / Smart Camera v2.0.0
Smart!
Home · Quick Start · Videos and Tutorials · Controls · Controller & Steam Deck · Smart Panel and HUD · FAQ · Feature Gallery · Buildable Gallery
Features
Smart Assistance · Grid Scaling · Transforms · Auto-Connect · Lift-assisted Auto-Connect · Conveyor Lift Grids · Water Extractors · Blueprints · Extend · Smart Walking · Smart Restore · Smart Upgrade · Smart Dismantle · Smart Camera · Camera Integration for Mod Authors
Reference
Glossary · Supported Buildings · Settings Reference · Compatibility and Multiplayer · FAQ · History and Credits · Support Development · Troubleshooting · Screenshot Checklist