Getting started with Kitra520
-
Artik 520 IoT module with Fedora preloaded
-
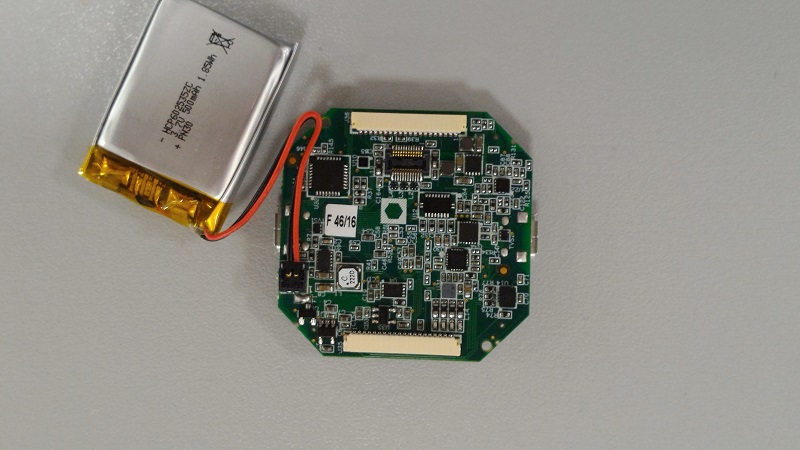
Kitra520 board with battery
-
2 micro-usb cables
-
1 PC
-
Wi-Fi access point with internet connection
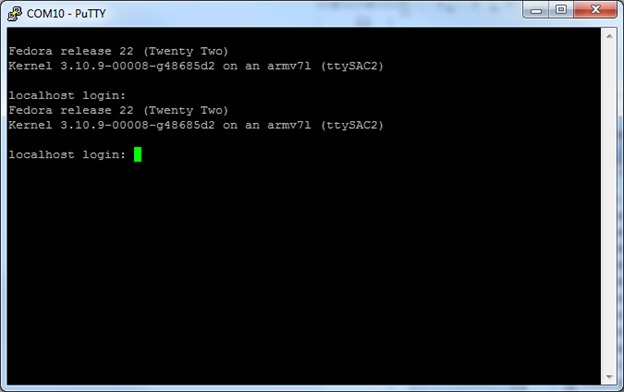
- An Artik520 running with Fedora OS
- FT232 Virtual COM port driver (http://www.ftdichip.com/Drivers/D2XX.htm)
We recommend charging the battery of the kitra520 board before doing anything.
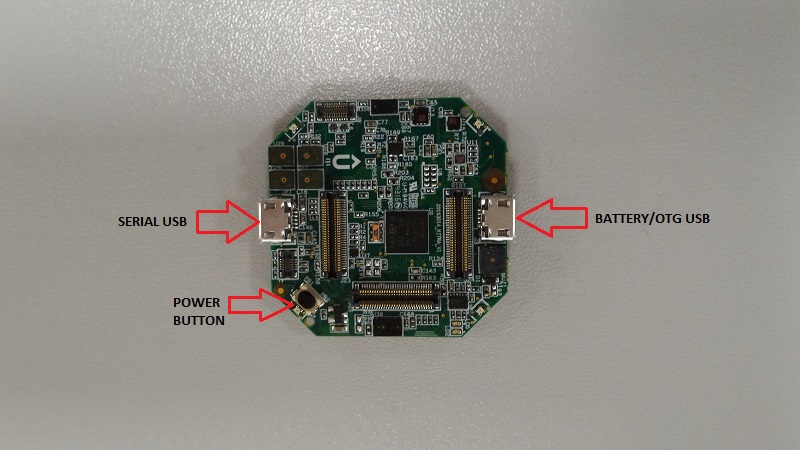
The micro-usb reserved for charging is the one close to the battery wires (indicated in the picture above as BATTERY USB). When the battery is charged, battery LED will be off.
-
All micro-usb cables must be unplugged
-
Plug onto Kitra520 the Artik 520 IoT module.
-
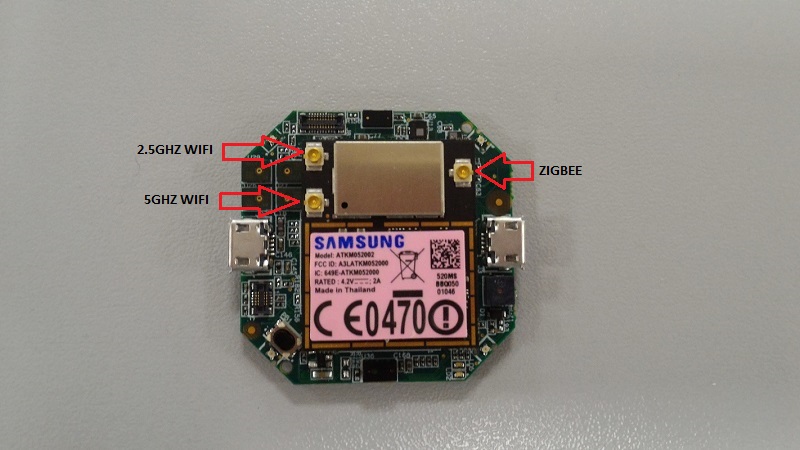
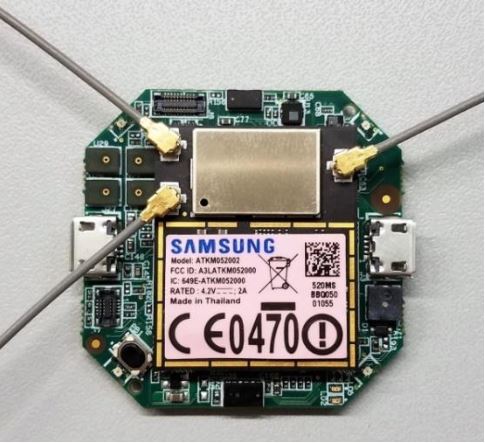
Plug the antennas
- Caution: Do not apply power (enable) the radio chips before connecting antennas or dam-
age to the chip may result.
- 5GHz Wi-Fi prescription: In the frequency band 5150-5350 MHz, the use of the KITRA 520
with Wi-Fi wireless communications are restricted to indoor use only.
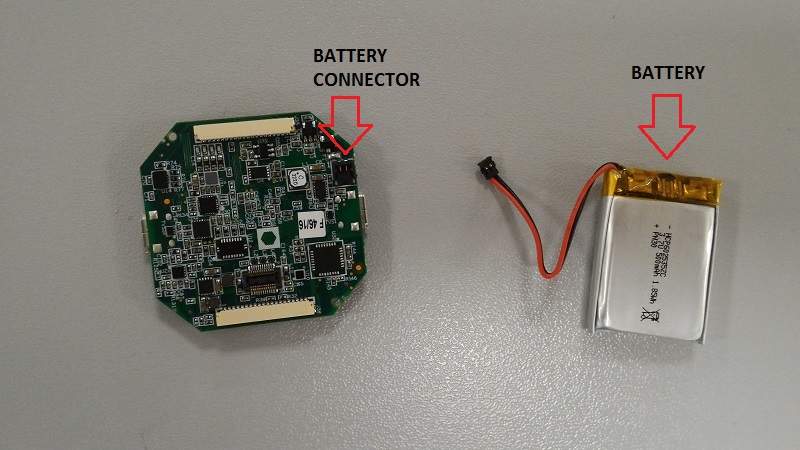
- Plug the battery to the Kitra520 board
 IMPORTANT BATTERY SAFETY NOTE
Since the KITRA 520 board in continuous operation can generate an overheating of its surface, it is prohibited to attach the lithium battery directly to the surface of the electronic boards otherwise the battery could be damaged. It's important to respect the temperature limits specified for both the battery and the KITRA 520.
IMPORTANT SAFETY NOTE
Do not let the battery connected dangling! Since the battery is connected to the KITRA 520 board through the connector it is mandatory that the battery is mechanically fastened to the an external support because the KITRA 520 battery connector cannot act as mechanical holder otherwise the battery connections can be damaged and cause the battery cable short circuit with potential damage of the board.
-
Plug the micro-usb battery cable if you want to prevent discharging of the battery.
-
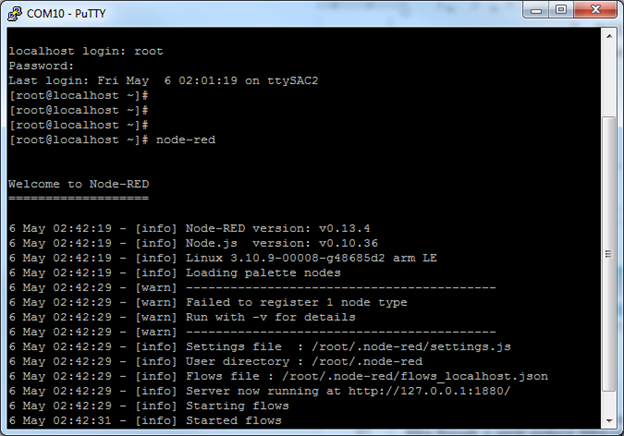
Push the power button on the Kitra520 for 2 seconds and then release it (you should hear a beep sound confirming that firmware has started).
-
Wait some seconds and then plug the debug micro-usb to a computer.
IMPORTANT FUNCTIONAL NOTE
It's important to plug the debug usb cable AFTER you've powered on Kitra520 the first time or you won't be able to attach any terminal. If you did that just unplug and replug the usb cable.
- Guide for serial communication click here (Press enter in the terminal to see if it is working).
If you don't see any virtual COM port avaiable, try installing "FT232 Virtual COM port driver" provided in the "Software required" paragraph.
If during the boot the system is stuck with an "eth0: ff" error, you have to replace the dtb file, check the Replacing the device tree via fastboot guide.
Connect to your Wi-Fi network:
Using connection manager
Run:
connmanctl
You will get a new '>' prompt.
>scan wifi
>agent on
>services
>connect wifi_xxxx
>quit
Once the Wi-Fi is configured, you can connect with ssh from your PC. You can check your ip address with:
ifconfig wlan0
At next reboot the board will connect to the network by itself.
Manual configuration
Do not do this if you already connected with a connection manager.
systemctl stop connman
systemctl disable connman
systemctl enable wpa_supplicant
wpa_passphrase <SSID> <PASSWD> >> /etc/wpa_supplicant/wpa_supplicant.conf
systemctl restart wpa_supplicant
# wait some seconds
iwconfig # check if <SSID> was joined
dhclient wlan0 #Get valid ip address
At next reboot you will only need to run dhclient wlan0.
Update Fedora (may take up to 20 minutes)
sed -i 's|archive\.fedoraproject\.org\/pub|archives\.fedoraproject\.org\/pub\/archive|g' /etc/yum.repos.d/*
dnf update
dnf upgrade wpa_supplicant
Additional informations at:
- Guide for Wifi click here
- Bring ARTIK up-to-date click here
You need to install node, npm, node-red and node-red-contrib-kitra.
$ dnf install node

$ dnf install npm

$ npm cache clean -f #to download last nodejs version

$ npm install -g n #to download last nodejs version

$ n stable #to download last nodejs version

$ reboot #required for upgrade

$ npm install -g --unsafe-perm node-red
Check your ip address with ifconfig wlan0 and write it down.
Now start node-red:
$ node-red
If you want to stop it, press ctrl-c
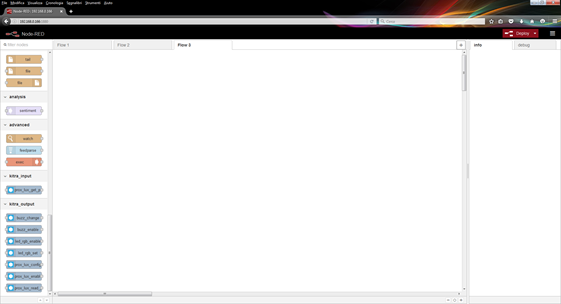
Open a browser and write in the url bar the address you writed down before, adding :1880 in the end.
You should see something like this:
Now select on the top-right menu "manage palette" and install these packages:

- node-red-node-serialport
- node-red-contrib-kitra
node-red-contrib-kitra is a node-red extenson to demonstrate kitra-com communication. Artik communicates with Kitra520 through a serial protocol (kitra-com) that uses NMEA-style messages. For more informations check the Kitra-COM document.
If you already know Node-RED you should notice that new nodes where added in the list, under kitra_input and kitra_output category.
After the installation of the node-red-contrib-kitra520 package, you will see at the left side panel a list of kitra520 nodes. Those help you parsing the communication to the KITRA520 board.
Kitra520 communicates with Artik through the serial-based KITRA-COM protocol, so the node-red module will create a string to send through the serial port or accept a string as input providing parsing and checksum calculations.
Node-red already has a module for handling serial communication, so you should use it to redirect output or input of Kitra520 nodes.
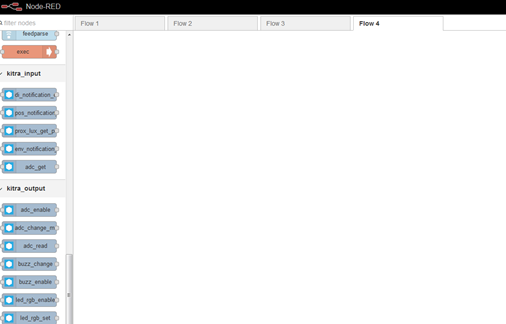
As you can see, nodes split in three categories:
-
Kitra520 input: nodes used to handle STM32 to Artik520 messages
-
Kitra520 output: nodes used to handle Artik520 to STM32 messages
-
*Kitra520 utility: not used for messages, may help to handle some sensor-typical calculations *
(Ex. adc conversion for ntc)
To communicate with a peripheral those are usually the step to follow:
-
Enable the peripheral
-
Configure the peripheral
-
Read/Set the peripheral value
With some peripheral is also possible to configure notifications, by configuring notification you will not need any additional reading command.
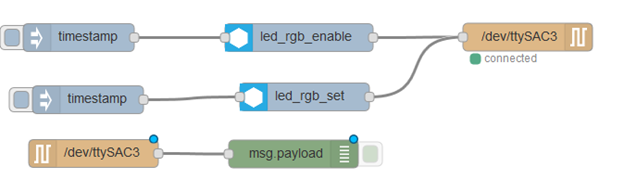
Drag into the flow an inject node, an output kitra520 led enable node and a serial output node.

Note: inject nodes let your start a program cycle

Double click on the serial node and configure it like this
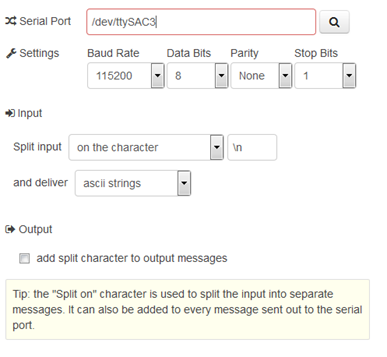
Note: /dev/ttySAC3 should be the default serial port used to communicate with kitra, if you find issues try to check wich serial ports are available in your Artik module
Drag another inject node and the led_rgb_set node and attach everything together:

Double click led_rgb_set node
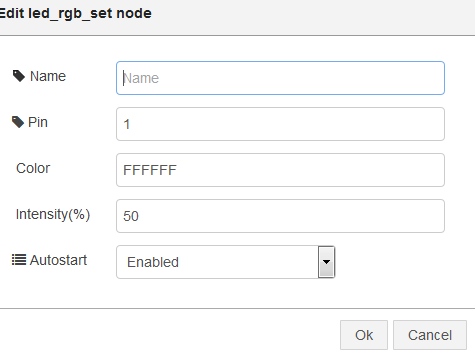
Insert any 24bit hex color in the Color field and a value from 0 to 100 for the intensity field. Leave autostart as enabled and press Ok.
Press the Deploy button on the top-right of the screen.

Now click the button of the first inject node:

Doing so, you will enable an rgb led but you will see nothing.
Press now the other inject node and see what happens.
Kitra520 answers to every command with a response or an acknowledge, to see it add a serial input node and a debug node:
Note: remember to configure the serial input too, like the serial output
Re-deploy your flow and see kitra’s responses in the debug tab:
In the next chapter we will show you how to read a sensor value from Kitra520 and sending it to the Artik cloud.
Before proceeding with the next example, we need to configure our artik cloud account.
Follow the artik cloud tutorial: click here
To create a manifest compatible with the next demo, create a new field called “prox1”.
Create the following flow:
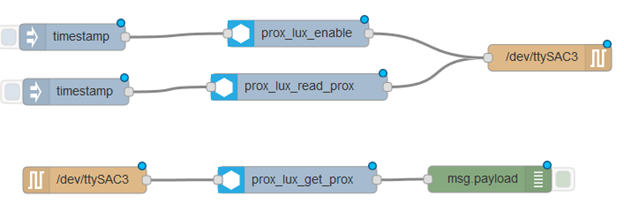
As you can see it is very similar to the led example, the main difference is that serial input node is plugged to the prox_lux_get_prox node.
This node uses the Kitra-COM message and outputs a clean proximity value.
Try to run it by pressing on the first inject node, and then the second.
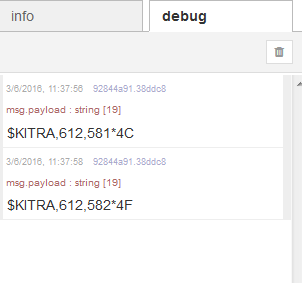
You should see in the debug tab the proximity value in millimeters.
Put your hand on the top of the kitra520 board and send again the read command, you will see that it has a lower value.
Connecting to artik.cloud:
-
Remove the debug node
-
Drag a function node and attach it to the prox_lux_get_prox node
-
Double click on the function node, put the following code:
msg.headers = {

"Content-Type": "application/json",

"Authorization": "Bearer [YOUR_AUTHORIZATION_TOKEN]"

};

msg.payload = {
"data": {"prox1": msg.payload},

"sdid": "[YOUR_DEVICE_ID]",

"type": "message"
};

return msg;-
Press ok
-
Drag an http request node and attach it to the function node

- Double click on the http request module, and fill the url filed with:
https://api.artik.cloud/v1.1/messages
- Now every proximity value received will be sent to artik.cloud
Note: you can issue automatic reading by double clicking on the inject node of the reading and setting the “Repeat” field to “interval”.
You can find other node-red examples here.
If you prefer C or other languages check this library: kitra-com-lib.
You may also be intrested in upgrading the to the lastest Kitra520 firmware, check the Firmware upgrade guide.
-
To turn off Artik you must send the command shutdown now (via terminal or ssh for example)
-
To turn off Kitra520 push the power button for 8 seconds until you hear the beep sound stopping. If you hear a double-beep that means you released the button too soon.
- If you plug the device before turning on the kitra, you see no data coming from the Artik. In these case, you need to unplug the micro-usb, wait some seconds, plug again and restart the serial terminal session.
-
The battery connector mounted on KITRA520 board is the Molex Pico-EZmate™ type. The connection has durability (mating cycles max) of maximum 10 cycles then use ON/OFF button for power off KITRA520 instead of unplug the battery.
-
The USB battery charger embedded in the KITRA520 520 generate 400mA of constant current during the charging phase then consider this for active state power consumption analysis and for other battery selection (in case you want to use another battery)
-
Lithium battery pack must be protected by external housing of the final product which KITRA520 board will be used
Products and specifications discussed herein are for reference purposes only. All information discussed herein is provided on an "AS IS" basis, without warranties of any kind. This document and all information discussed herein remain the sole and exclusive property of Rush Up. No license of any patent, copyright, mask work, trademark or any other intellectual property right is granted by one party to the other party under this document, by implication, estoppel or other-wise. Rush Up products are not intended for use in life support, critical care, medical, safety equipment, or similar applications where product failure could result in loss of life or personal or physical harm, or any military or defense application, or any governmental procurement to which special terms or provisions may apply. For updates or additional information about Rush Up products, contact Rush Up office. All brand names, trademarks and registered trademarks belong to their respective owners. Rush Up is a trademark of FAE srl and FAE++ srl.