Python toolset to control the Liene PixCut S1 over USB bulk endpoints.
StixCut is my full-featured desktop app for the Liene PixCut S1. It adds a polished visual workflow with drag-and-drop sheet layout, Auto-Pack, editable and SVG cutlines, contour perf-cut + peel tabs, material profiles, on-device background removal, multi-printer support, and USB + Bluetooth connectivity.
StixCut is free for light use and available for both macOS and Windows.
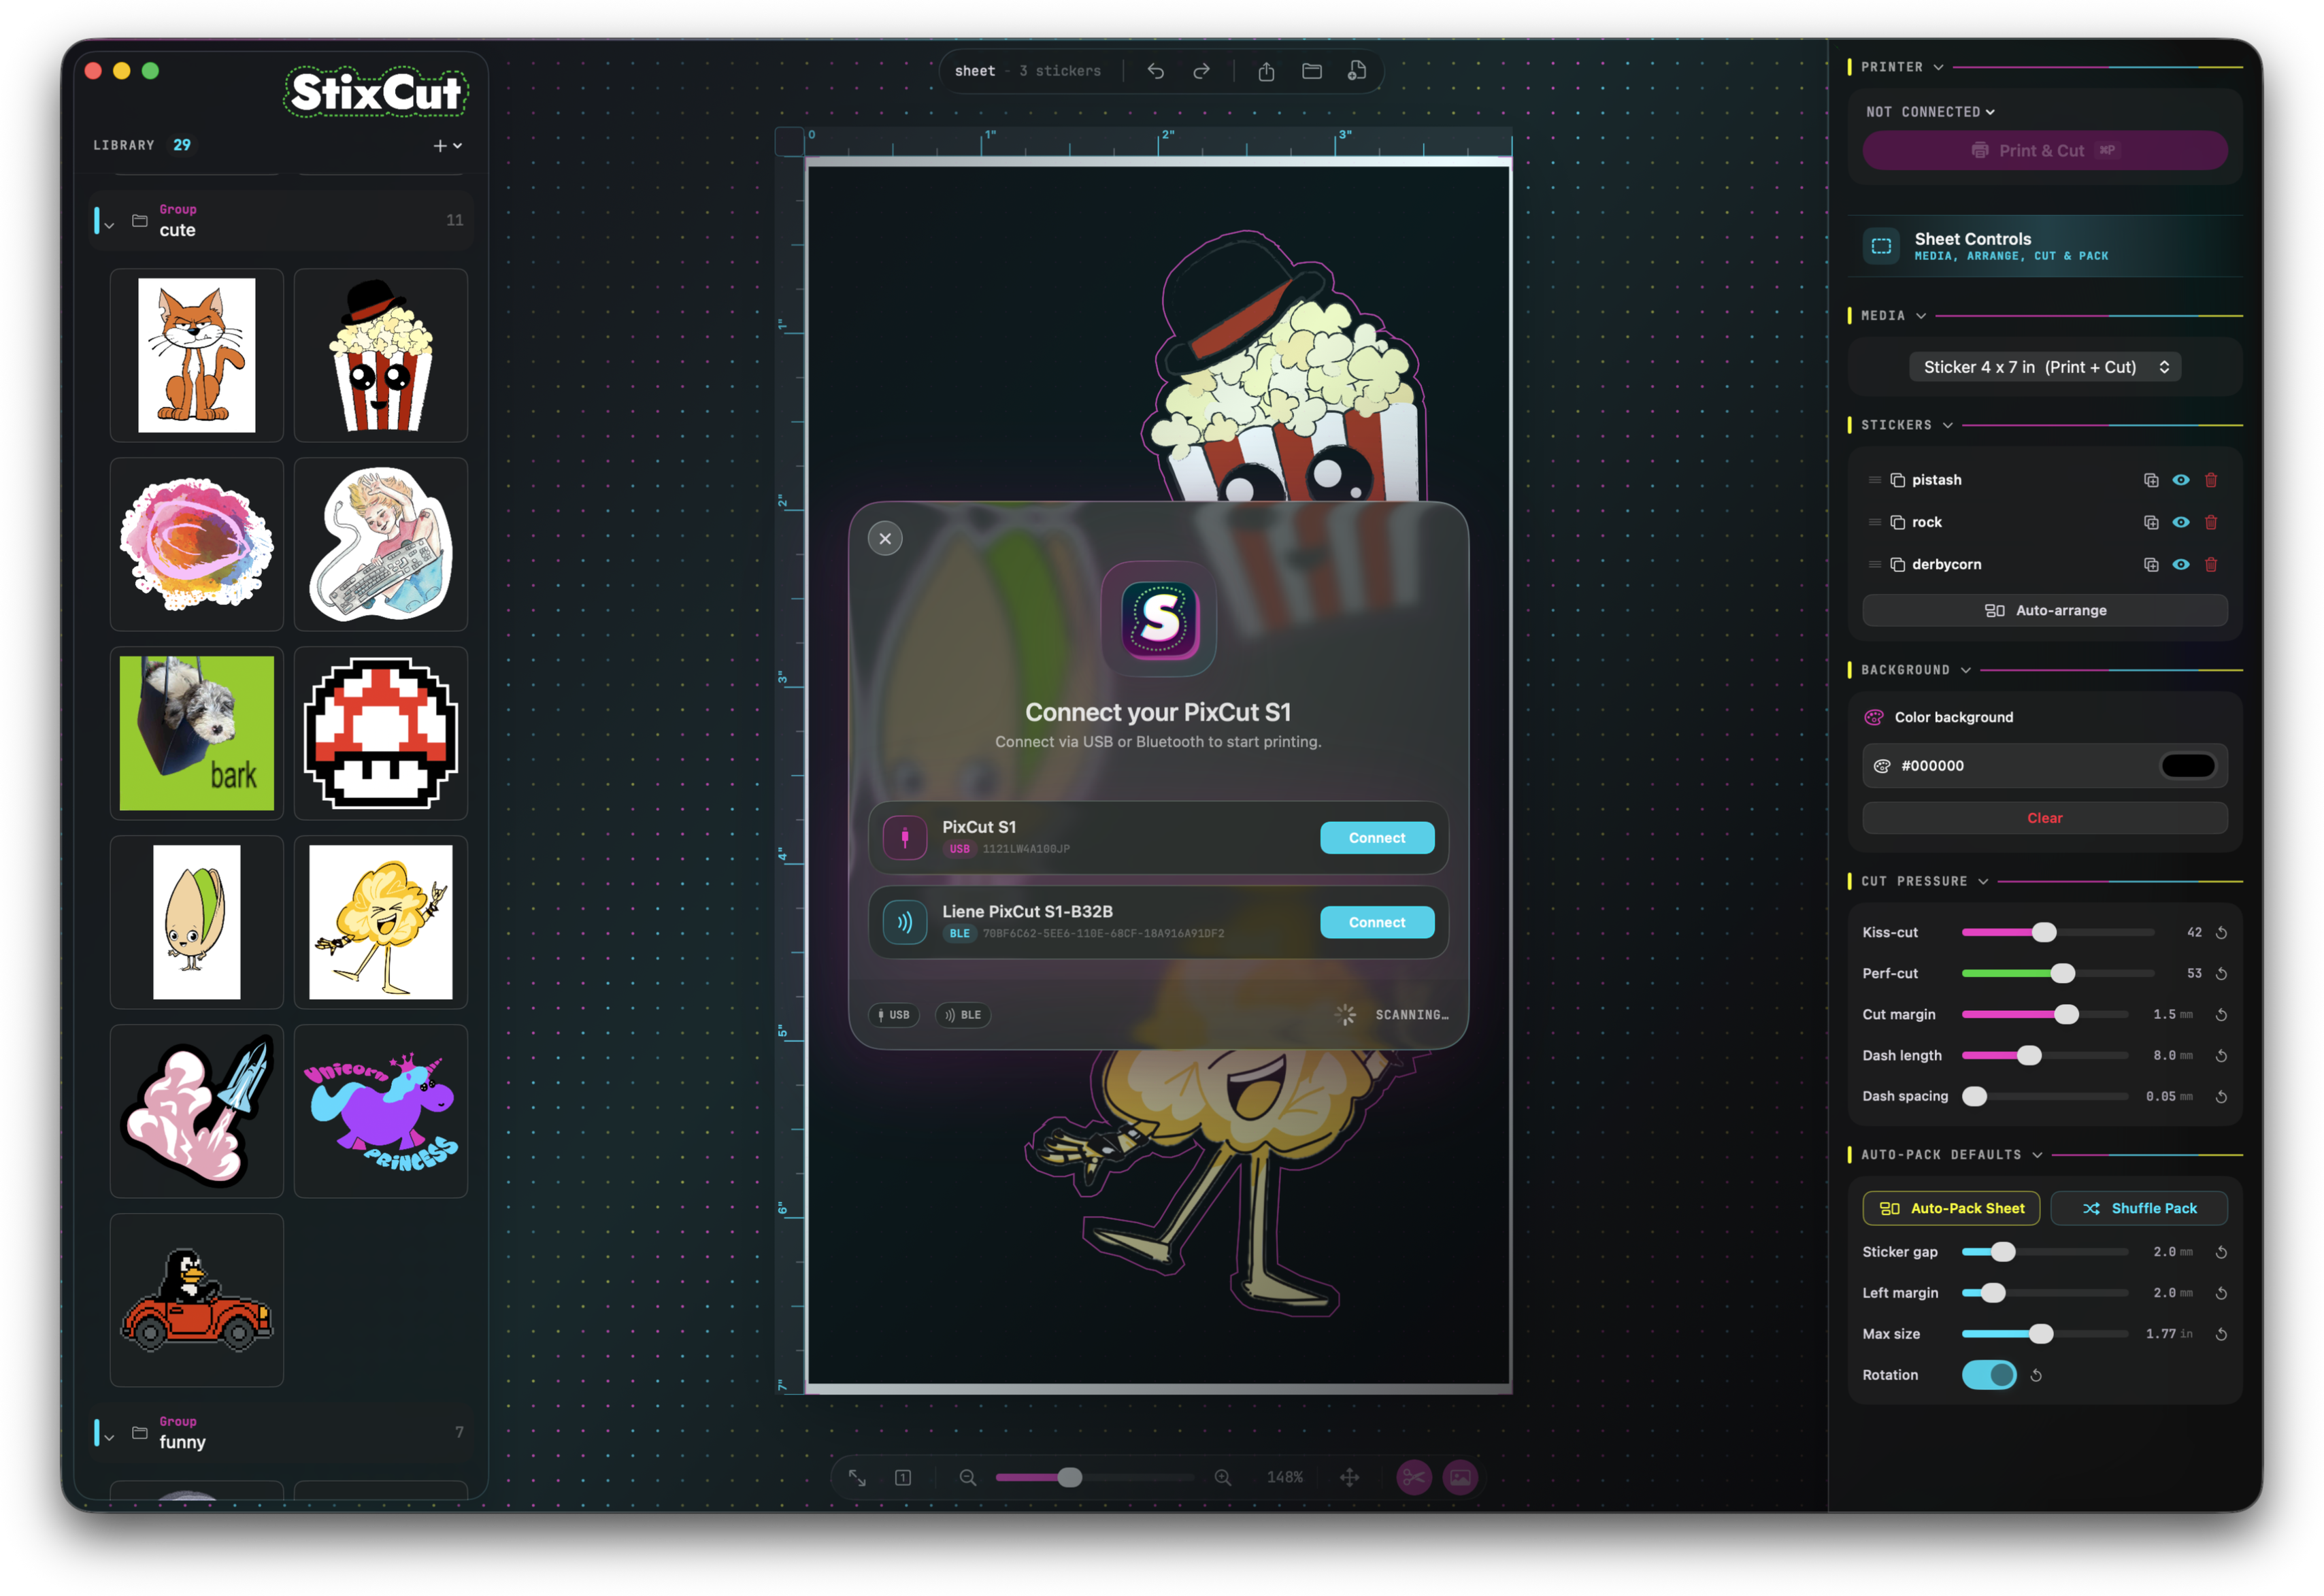
Get StixCut for macOS or Windows →
StixCut is a separate application and its source code is not part of this repository. PixCut CLI + Kiosk remains the open-source toolkit documented below.

This repo contains three independent but related tools:
- PixCut CLI (
pixcut_cli.py+pixcut/) — command-line tool for sending print/cut jobs, auto-generating cut paths, and inspecting the printer over USB. This is the core; everything else builds on it. - pixcut-kiosk (
server.py+static/) — a local web UI that wraps the CLI into a point-and-click sticker builder. No command line needed during a session. - Raspberry Pi deploy (
deploy.sh,deploy/99-pixcut.rules,deploy/pixcut-kiosk.service) — automated script to sync and configure the kiosk on a Pi over SSH, including udev rules and a systemd service.
If you just want to drive the printer from a Mac or PC, you only need the CLI. The kiosk and deploy script are for a dedicated touchscreen kiosk setup.
brew install libusb
python3 -m venv .venv && source .venv/bin/activate
pip install -r requirements.txt
pip install -r requirements-server.txt # optional, to run the GUI/kiosk server on this machinesudo apt-get install -y libusb-1.0-0
python3 -m venv .venv && source .venv/bin/activate
pip install -r requirements.txt
pip install -r requirements-server.txt # optional, to run the GUI/kiosk server on this machineFor non-root USB access, install the included udev rule (required unless you run as root):
sudo cp deploy/99-pixcut.rules /etc/udev/rules.d/
sudo udevadm control --reload-rules && sudo udevadm trigger
sudo usermod -aG plugdev $USER # log out and back in after thisA fully automated deployment script is included for kiosk deployment to Raspberry Pi OS — see Raspberry Pi Kiosk Deployment below.
python -m venv .venv
.venv\Scripts\activate
pip install -r requirements.txt
pip install -r requirements-server.txt   # optional, to run the GUI/kiosk server on this machine
libusb-package (included in requirements.txt) bundles the USB backend automatically for most Python versions — no extra steps needed. If you see "USB backend not found", see Windows USB troubleshooting below.
libusb-package has a release lag — newly released Python versions may not yet have a bundled-DLL wheel, so pip install succeeds but the USB backend is missing. If you see "USB backend not found":
-
Download the latest Windows binary from github.com/libusb/libusb/releases — get the
.7zarchive (requires 7-Zip to open). -
Extract the DLL matching your Python installation:
Python DLL path inside the archive 64-bit (most common) VS2022\MS64\dll\libusb-1.0.dll32-bit VS2022\MS32\dll\libusb-1.0.dllARM64 VS2022\ARM64\dll\libusb-1.0.dllNot sure which you have? Run:
python -c "import struct; print(struct.calcsize('P')*8, 'bit')" -
Place
libusb-1.0.dllin thepixcut\folder inside this project.
Once libusb-package ships a wheel for your Python version, a fresh pip install -r requirements.txt will pick it up and you can remove the manual DLL.
Zadig note: If you have never installed Liene's official software, Windows has no driver bound to the device and libusb claims it automatically — no extra steps needed. If you have the Liene app installed, you may need Zadig to rebind the device driver to WinUSB.
The repo includes a sample sticker (meow.jpg + meow.svg) and layout templates to help you get started:
| File | Description |
|---|---|
examples/meow.jpg |
Sample print image — a die-cut cat sticker at 300 DPI |
examples/meow.svg |
Matching hand-drawn cut paths for meow.jpg |
examples/sticker-sheet-template.af |
Affinity Studio template showing a full 4×7″ sticker sheet layout |
examples/sticker-sheet-template.pdf |
PDF version of the template (for Inkscape/Illustrator/other applications) |
python3 pixcut_cli.py send --mode combo --jpg examples/meow.jpg --svg examples/meow.svgIf you have a PNG/JPG sticker image without a pre-drawn cut path, layout traces one automatically:
python3 pixcut_cli.py layout examples/meow.jpg --repeat 4 --out-dir ./output
python3 pixcut_cli.py send --mode combo --jpg output/layout.jpg --plt output/layout.pltOpen examples/sticker-sheet-template.af (Affinity Designer) or examples/sticker-sheet-template.pdf to see how to lay out artwork on the 4×7″ canvas. The template has separate layers for the SVG cut paths and the art. The art should be saved as a .jpg file, 1200×2100 px, and must be under 1 MiB in size; the SVG layer should be exported as simple paths without fills or any other art.
Files: pixcut_cli.py, pixcut/
send— run a print-only or combo (print+cut) job.layout— auto-trace cut paths from PNG/JPG sticker images and export a print-ready sheet (no USB).convert— offline SVG→PLT converter (no USB).query— send a single JSON request (get-prop, get-job-info, etc.).probe— batched property sweep + optional experimental methods; optionalset-prop(guarded).printer— sendpause-printerorresume-printer.scan— list visible USB devices, highlighting PixCut devices.job— list active printer jobs or cancel one by job ID.
All commands share USB flags: --vid/--pid --interface --out-ep --in-ep --data-interface --data-out-ep --data-in-ep --timeout-ms --auto-detect/--no-auto-detect.
Use --verbose to enable per-session file logging (see Logging below).
Typical working endpoints (from captures): control JSON on interface 2 OUT 0x06 IN 0x86; data on interface 3 OUT 0x04 IN 0x84.
By default no files are written — output goes to the console only. Pass --verbose to capture a full session directory under run-logs/session-<timestamp>/:
- JSONL:
requests_sent.jsonl,responses_seen.jsonl,requests_and_responses.jsonl - Raw frames:
raw/*.bin - Any converted PLT files (when using
--svg)
python3 pixcut_cli.py send \
  --mode combo \
  --jpg photo.jpg \
  --plt path.plt \
  --media-size 5013 --media-type 2030 \
  --copies 1 --quality 4 \
  --channel 14864 \
  --kp 42
Modes:
--mode combo(default): requires--jpgand--plt(or--svgto convert to PLT).--mode print: requires--jpg; sends a photo-only job (no cutting).
Key options:
--svgauto-converts SVG → PLT and uploads the generated PLT. Supports color-coded perf-cut — see convert below.--kpkiss-cut knife pressure applied to standard paths (default 42).--perf-color HEXstroke color marking perf-cut paths in--svginput (defaultff8800/ orange).--perf-kp Nknife pressure for perf-cut paths (default 53).--perf-dash MMperf-cut dash length in mm (default 8.0).--perf-gap MMgap between dashes in mm (default 0.05).--job-typeoptional; defaults to 0 for print, 600 for combo/cut.--chunk-delay-ms(default 120) pacing between data chunks.--extlen(default 4075) chunk size.--ack-timeoutper-chunk ACK wait (seconds).--heartbeat-interval(default 5s) background get-prop pings.--poll-interval(default 2s) job status polling after upload.--max-poll-secondsoverall poll timeout (0 = unlimited).--id-strategy {monotonic,fixed}: monotonic (default) uses ever-increasing ids; fixed mimics captured ids.--interface: If auto-detect fails, set endpoints explicitly, e.g.--interface 2 --out-ep 0x06 --in-ep 0x86 --data-interface 3 --data-out-ep 0x04 --data-in-ep 0x84.
Constraints:
- JPG must be ≤ 1 MiB (device limit).
- For standard 300-DPI media, PixCut automatically applies the printer's registration raster: 4×7 logical 1200×2100 is padded to 1216×2128 (8 px left/right, 14 px top/bottom). Already-padded files are left unchanged.
Traces cut paths from raster sticker images and packs them onto the 4×7″ canvas using a Maximal Rectangles packer (fills gaps beside tall stickers — much better than shelf-only packing). Requires Pillow and scikit-image.
# Single sticker, 3 copies
python3 pixcut_cli.py layout sticker.png --repeat 3 --out-dir ./output

# Multiple stickers, paginate overflow onto additional sheets
python3 pixcut_cli.py layout s1.png s2.png s3.png --paginate --out-dir ./output

# JPEG / PNG without alpha
python3 pixcut_cli.py layout photo.jpg --bg-white --out-dir ./output

# With perf-cut (pop-out outer dashed lines at higher KP)
python3 pixcut_cli.py layout sticker.png --perf-cut --perf-kp 53 --perf-dash 8 --out-dir ./output
Outputs in --out-dir:
| File | Description |
|---|---|
layout.jpg |
Composite sticker sheet — pass to send --jpg |
layout.plt |
Cut paths (kiss-cut + optional perf-cut) — pass to send --plt |
layout_cut.svg |
SVG preview: kiss-cut in red, perf-cut in orange dashed |
With --paginate, overflow sheets are written as layout_1.*, layout_2.*, etc.
| Flag | Default | Description |
|---|---|---|
--dpi N |
300 | Output resolution. A 300×300 px image at 300 DPI = 1×1 inch sticker. |
--margin MM |
2.0 | Outward offset of cut path from sticker edge in mm. |
--padding MM |
3.0 | Gap between sticker footprints on canvas in mm. |
--left-margin MM |
0.0 | Extra left paper margin in mm (shifts all cuts away from left edge). |
--kp N |
42 | Knife pressure for kiss-cut PLT output. |
--repeat N |
1 | Place each input image N times. |
--bg-white |
— | Treat white pixels as transparent (JPEGs / white-bg PNGs). |
--paginate |
— | Create extra sheets for overflow images. |
--perf-cut |
— | Add dashed outer perf-cut contours at higher KP. |
--perf-kp N |
53 | Knife pressure for perf-cut lines. |
--perf-dash MM |
8.0 | Dash length in mm. |
--perf-gap MM |
0.05 | Gap between dashes in mm. |
Then send to the printer:
python3 pixcut_cli.py send --jpg output/layout.jpg --plt output/layout.pltA perf-cut scores the backing paper in a dashed pattern along the kiss-cut line, letting stickers pop out cleanly by hand. The perf-cut runs at a higher knife pressure in alternating short bursts — the cut segments score through the backing while the gaps leave bridges that hold the sheet together. Liene does not support perf-cut in their official software, but the hardware is capable of it — this CLI generates the necessary PLT paths.
- Recommended settings:
--perf-kp 53 --perf-dash 8 --perf-gap 0.05 - Verify with the SVG preview at actual size before cutting — kiss-cut contours appear in red.
- Perf-cut scores through the backing paper, which will wear the cutting strip under the blade over time. That strip is not officially user-replaceable on the PixCut S1, but it can be replaced with a similarly-sized 8mm cutting strip (such as those sold for Graphtec/Roland cutters).
Converts SVG vector paths into the PixCut's HPGL-like PLT format. Supports color-coded perf-cut paths in the same SVG file.
python3 pixcut_cli.py convert --svg input.svg --out output.plt --kp 42Draw your kiss-cut paths in any color and your perf-cut paths with stroke color #ff8800 (orange). The converter automatically separates them:
- Kiss-cut paths → PLT at
--kp(default 42) - Orange paths → PLT at
--perf-kp(default 53) with dashed segments
python3 pixcut_cli.py convert \
  --svg my_design.svg \
  --kp 42 \
  --perf-kp 53 \
  --perf-dash 8 \
  --perf-gap 0.05
The same perf-cut flags work on send --svg.
| Flag | Default | Description |
|---|---|---|
--kp N |
42 | Kiss-cut knife pressure |
--perf-color HEX |
ff8800 |
Stroke hex color marking perf-cut paths (set to "" to disable) |
--perf-kp N |
53 | Perf-cut knife pressure |
--perf-dash MM |
8.0 | Dash length in mm |
--perf-gap MM |
0.05 | Gap between dashes in mm |
Defaults (not user-tuned): DPI 96, units/inch 1016, rotate −90°, target 4×7 in. Translation offsets --tx/--ty available for manual nudging.
Ad-hoc single request.
- Props:
python3 pixcut_cli.py query --props printer-state printer-sub-state - Identity bundle:
--identity - Job info:
--job-id 54 - Custom:
--method get-prop --params '["big-data"]'— on Windows cmd.exe use double quotes:--params "[\"big-data\"]"(PowerShell accepts single quotes as-is) - Repeat:
--repeat 5 --interval 2.0
Sweeps common properties in batches and logs responses.
python3 pixcut_cli.py probe
python3 pixcut_cli.py probe --experimental        # add broader/less certain props
python3 pixcut_cli.py probe --methods get-job-info --job-id 54
--dangerous --set-prop key=value [...] to send a set-prop mutation (example: auto-off-interval=600).
python3 pixcut_cli.py printer --pause
python3 pixcut_cli.py printer --resumepython3 pixcut_cli.py job --list
python3 pixcut_cli.py job --cancel 42The send loop also uses get-job-id-list automatically to recover if a job ID becomes stale after repeated status-query timeouts. Ctrl-C during an active send attempts cancel-job before closing USB.
python3 pixcut_cli.py scanProtocol/engine regressions use the standard library test runner:
python3 -m unittest discover -s tests- Uploads log per-chunk progress with bytes/percent for PLT and JPG.
- Poll loop logs concise state lines: job/printer state, print page, cut progress %, transfer %.
- Final
big-datafetched after completion.
Files: server.py, static/
An optional local web server for building sticker sheets interactively — no command line required during a session. The CLI remains fully independent.
Platform note: The kiosk is designed for Raspberry Pi 4 or newer running Raspberry Pi OS. A Pi 3B will struggle — Firefox is slow and Chromium won't launch on current Raspberry Pi OS on Pi 3B.
python server.py
# open http://localhost:8000 in a browser
Two-panel layout:
- Left — live JPEG preview of the 4×7″ canvas, updated after every change.
- Right — scrollable sticker grid loaded from the
stickers/folder. Click a sticker to add it; use +/− to set quantity; drag the slider (25%–200%) to resize.
Controls:
- Clear Canvas — remove all stickers.
- Print & Cut — finalise the layout, send to the printer, and display a live status overlay (polling every 1.5 s).
- Overflow banner — appears when stickers don't fit; reduce count or size.
python server.py [options]Defaults are read from server.json in the project root. CLI flags always override the config file. Admin panel changes (knife pressure, margins, perf-cut settings, background image) are written back to server.json automatically.
server.json keys:
| Key | Default | Description |
|---|---|---|
host |
"127.0.0.1" |
Bind address ("0.0.0.0" to expose on LAN) |
port |
8000 |
HTTP port |
stickers |
"stickers" |
Path to stickers directory |
backgrounds |
"backgrounds" |
Path to backgrounds directory |
dpi |
300 |
Layout resolution |
margin_mm |
1.0 |
Cut margin outside sticker edge |
padding_mm |
2.0 |
Gap between stickers on canvas |
left_margin_mm |
3.0 |
Left paper margin |
kp |
42 |
Knife pressure (1–100) |
usb |
true |
Enable USB drive sticker scanning |
auto_detect |
true |
Auto-detect printer VID/PID |
vid |
null |
Explicit USB Vendor ID hex string, e.g. "0x302C" |
pid |
null |
Explicit USB Product ID hex string, e.g. "0x3101" |
perf_cut |
false |
Enable perf-cut (pop-out lines) |
perf_kp |
53 |
Perf-cut knife pressure |
perf_dash_mm |
8.0 |
Perf-cut dash length (kiss-cut bridges) |
perf_gap_mm |
0.05 |
Perf-cut gap length (full-cut segments) |
bg_image |
null |
Background image filename (from backgrounds/) |
CLI flags (all correspond to the keys above):
| Flag | Description |
|---|---|
--config |
Path to config file (default: server.json) |
|--host|Bind address|
|--port|HTTP port|
|--stickers DIR|Stickers directory|
|--dpi N|Layout resolution|
|--margin MM|Cut margin in mm|
|--padding MM|Gap between stickers in mm|
|--kp N|Knife pressure|
|--left-margin MM|Left paper margin in mm|
|--no-usb|Disable USB drive scanning|
|--no-auto-detect|Disable USB auto-detect|
|--vid / --pid|Explicit USB VID/PID (hex)|
The kiosk loads PNG files from the stickers/ directory. Subfolders appear as section headers in the grid:
stickers/
  cat.png               # appears under no header (root)
  dogs/
    corgi.png           # appears under "dogs" header
    poodle.png
  2024-events/
    kernelcon.png       # appears under "2024-events" header
USB drives are automatically scanned for PNG files and appear under a USB: <label> header. The grid refreshes automatically within 5 seconds of a drive being plugged or unplugged. Supported mount roots: /media and /mnt (Linux), /Volumes (macOS), and External USB drives (Windows). Pass --no-usb to disable USB drive scanning entirely.
Place background images (JPG or PNG) in backgrounds/ under the project root. They are composited under the stickers in the print layer only — cut paths are unaffected.
To change the active background: tap the title 5 times to open the admin panel, then pick from the Background Image dropdown.
The backgrounds directory is configurable:
python server.py --backgrounds /path/to/backgrounds| Setting | Default | Description |
|---|---|---|
| Knife Pressure | 42 | Kiss-cut KP for all sticker outlines |
| Cut Margin | 1.0 mm | Outward offset of cut path from sticker edge |
| Sticker Gap | 2.0 mm | Gap between sticker footprints on canvas |
| Left Paper Margin | 3.0 mm | Extra margin to keep cuts off the left edge |
| Background Image | None | Print-layer background (no cut path) |
| Perf-Cut | off | Dashed scoring pattern along cut lines for easy pop-out |
| Perf-Cut KP | 53 | Knife pressure for perf lines |
| Dash Length | 8.0 mm | Length of each perforated dash |
| Gap Length | 0.05 mm | Gap between dashes (kiss-cut bridges) |
Export buttons: JPEG Image (print-ready composite), SVG Cutlines (cut path preview — kiss-cut in red), and PLT File (raw cutter instructions for debugging).
The kiosk has no authentication. On untrusted networks (e.g. conference Wi-Fi) bind to localhost only:
# Bind to localhost only (edit the service file, then reload)
sudo sed -i 's/--host [0-9.]*/--host 127.0.0.1/' /etc/systemd/system/pixcut-kiosk.service
sudo systemctl daemon-reload && sudo systemctl restart pixcut-kiosk
To access the UI remotely when locked to localhost, SSH-tunnel it:
ssh -L 8000:localhost:8000 <PI_USER>@<PI_HOST>
# then open http://localhost:8000 in your browserFiles: deploy.sh, deploy/99-pixcut.rules, deploy/pixcut-kiosk.service, deploy/launch-kiosk.sh
Automates syncing and configuring the kiosk on a Pi over SSH.
# Defaults: host=raspberrypi.local  user=pi  (set PI_PASS env var if using sshpass)
./deploy.sh

# Override any value inline
PI_HOST=mypi.local PI_USER=pi PI_PASS=yourpassword ./deploy.sh
The script:
- rsyncs the project (excluding
.venv/,__pycache__/, etc.) - Installs system packages (
python3-venv,libusb-1.0-0,chromium) - Installs udev rule + adds user to
plugdev - Creates
.venvand installs all Python dependencies - Installs and starts
pixcut-kiosk.service(systemd) - Prompts whether to auto-launch Chromium at desktop login (see below)
After deploy: http://<PI_HOST>:8000
deploy/launch-kiosk.sh opens Chromium fullscreen pointing at the kiosk UI. The deploy script will ask:
Auto-launch Chromium at desktop login? [y/N]
- Y — writes an XDG autostart entry (
~/.config/autostart/pixcut-kiosk-browser.desktop). Chromium opens automatically whenever the desktop loads. Only enable this on a dedicated touchscreen display — kiosk mode is fullscreen with no browser chrome, and without a keyboard/mouse there is no way to exit. - N — creates a
PixCut-Kioskdesktop icon instead. Double-tap it to open the browser manually.
To change this after deploy, re-run deploy.sh and answer differently, or manage the autostart file directly:
# Remove autostart (revert to manual desktop icon)
rm ~/.config/autostart/pixcut-kiosk-browser.desktop

# Launch manually at any time
~/pixcut-app/deploy/launch-kiosk.shssh <PI_USER>@<PI_HOST>
sudo systemctl status pixcut-kiosk
journalctl -u pixcut-kiosk -f # live logs
sudo systemctl restart pixcut-kioskdocs/pixcut-usb-protocol.md documents the reverse-engineered USB wire format — JSON control messages, bulk data framing, endpoint layout, and observed property names. Useful if you want to extend the CLI, add new commands, or port the protocol to another language.
MIT License — see LICENSE for the full text.
No affiliation with the vendor. Use at your own risk.