




This application is an extended version of Labelme, designed for interactive 2D/3D segmentation and annotation of electron microscopy (EM) and other scientific images. It supports:
- Viewing and annotating 2D slices and 3D volumes
- Loading TIFF stacks for volumetric data
- Automatic AI-assisted segmentation
- Manual mask editing and refinement
- 3D rendering via VTK
- Python 3.8+
- GPU recommended for AI-assisted segmentation
- OS: Linux, macOS, or Windows
Key dependencies include:
PyQt5– GUI frameworkvtk– 3D renderingtifffile– TIFF image I/Occ3d– connected component analysisscikit-image,scipy,numpy– image processingimgviz– visualization utilities
git clone https://github.com/luckieucas/cellable.git
cd cellable

# Setup conda
conda create --name cellable python=3.9
conda activate cellable

# Install dependencies
pip install -r requirements.txt

# Install cellable
pip install -e .conda activate cellable
cellable

Video 1: Launching Cellable Application (Click to watch on YouTube)
- Toolbar: File operations, AI segmentation, view adjustments
- Canvas Area: Displays current image or 3D slice
- Label List: Shows all current annotations
- Status Bar: Displays slice index, zoom level, current tool


Video 2: Interface Overview and Navigation (Click to watch on YouTube)
- Images:
.png,.jpg,.tif,.tiff - Volume Data: Multi-page TIFF stacks
- Open Image/Stack:
File → Open(open files manually each time) - For 3D TIFF stacks, a slider will appear for slice navigation
- Use
A/Dkeys or the slider to navigate between slices
Use File → Delete Slice... to remove the current slice from both the image volume and the mask volume.
This is useful for blank or misaligned EM slices. Cellable creates backup files before overwriting the original volume files.


Video 3: Loading Different Types of Data (Click to watch on YouTube)
- Mouse Scroll: Change zoom level
- Arrow Keys/Slider: Move between slices
- Drag: Pan the view


Video 4: View Navigation Operations (Click to watch on YouTube)
- Click on canvas to create vertices
- Double-click to complete drawing
- Right-click to edit vertices


Video 5: Using the Polygon Tool (Click to watch on YouTube)
- Select brush size
- Paint mask regions
- Use eraser to remove areas


Video 6: Using the Mask Tool (Click to watch on YouTube)
- Select the AI tool
- Click inside the region of interest
- Automatic segmentation generation


Video 7: SAM AI Segmentation Demo (Click to watch on YouTube)
- Faster segmentation speed
- Suitable for batch processing


Video 8: Efficient SAM Fast Segmentation (Click to watch on YouTube)
- Input descriptive text
- Automatic annotation generation


Video 9: Text-to-Annotation Conversion (Click to watch on YouTube)
- Move, resize, or delete shapes
- Merge or split regions
- Adjust brightness/contrast
- Switch to View / Select
- Select one mask object, or right-click the object region
- Choose Change Selected Object Label...
- Enter the new label ID
Only the selected object on the current slice is changed. Other slices and other objects with the same label ID are not relabeled.


Video 10: Mask Editing Operations (Click to watch on YouTube)
Each label has a lifecycle state to track annotation progress:
- PROPOSED: Labels from AI, watershed, or auto-segmentation
- EDITED: User has modified the label
- VERIFIED: User has confirmed the label is correct
- Show dropdown: Filter labels in the Label List by state (All, Proposed, Edited, Verified, Not Verified)
- Hide VERIFIED in views: Toggle to hide verified labels in 2D/3D views (reduces distraction)
- Solo mode: Show only the selected label in views
- Show All: Reset visibility and exit solo mode
Visibility settings (filter mode, hide verified, per-label checkbox) are persisted with the project.
- Verify (F): Mark selected label as verified
- Revert (R): Restore label to proposed state
- Reject (Delete): Delete label
- Commit (Ctrl+Enter): Write labels to final exported segmentation
- Type in the search box above the Label List to filter labels by ID
- Press Enter to jump to the middle slice where the matched label exists
- Supports partial and exact match
- Double-click any label in the Label List to jump to the middle slice of that label
- Right-click a label → "Go to Middle Slice" for the same action
- Select the 3D Watershed tool
- Place seed points on the volume
- Apply to separate adhered instances across slices
Watershed preserves disconnected parts of the original target label that do not contain seeds. This prevents unseeded pieces from being deleted when correcting a large false merge.

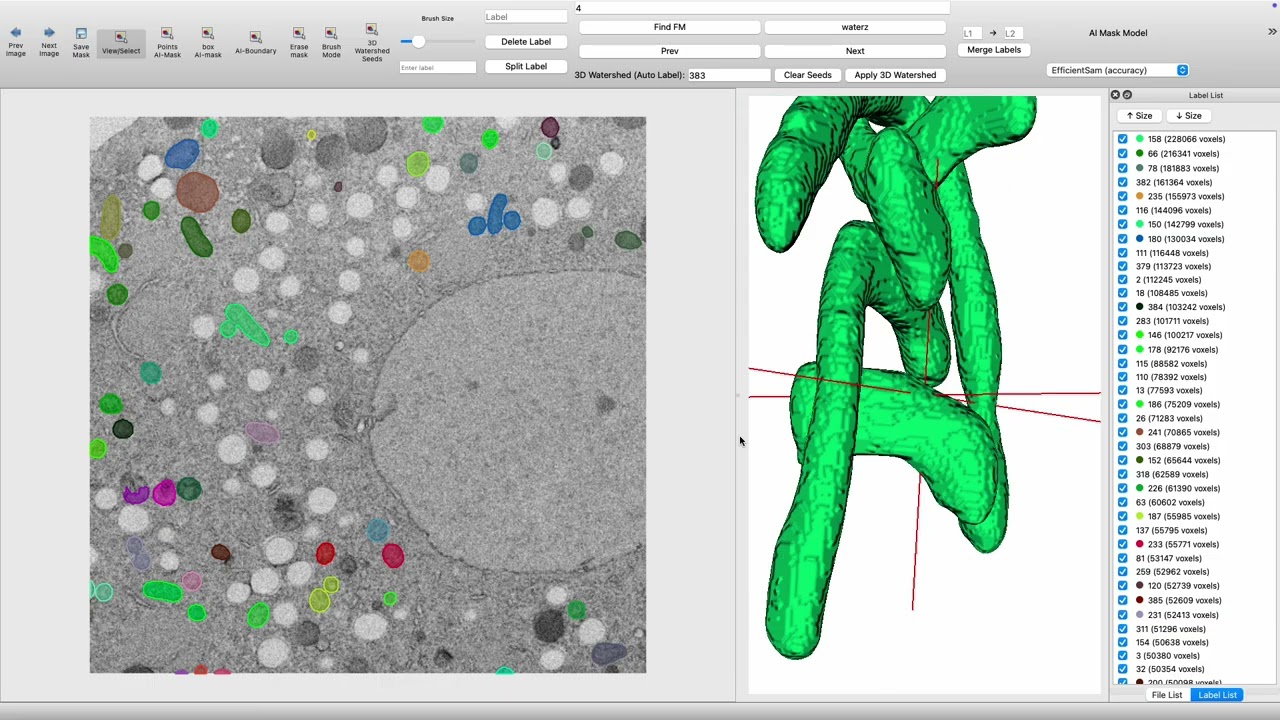
Video 11: Watershed Segmentation for Instance Separation (Click to watch on YouTube)
- View → 3D Viewer
- VTK-based 3D visualization of masks
- Rotate, zoom, and inspect segmented structures


Video 12: Using the 3D Viewer (Click to watch on YouTube)
File → Savestores as.jsonformat- Mask data can be exported as NumPy arrays
- JSON annotation files
- VOC dataset format
- COCO dataset format


Video 13: Save and Export Operations (Click to watch on YouTube)
Note: Shortcuts do not fire when typing inside text fields (e.g. label search, brush label input). Use
Ctrl+ForCtrl+Lto focus search/input fields first.
| Action | Shortcut |
|---|---|
| Previous slice | A |
| Next slice | D |
| Axial / Coronal / Sagittal view | Use Axis dropdown in toolbar |
| Action | Shortcut |
|---|---|
| View / Select | V or Escape |
| Brush mode | B |
| Erase mode | E |
| AI Mask mode | P |
| Rectangle mode | M |
| 3D Watershed mode | T |
| Action | Shortcut |
|---|---|
| Verify (Finalize) selected label | F |
| Revert selected label to proposed | R |
| Reject (delete) selected label | Delete or Backspace |
| Commit changes | Ctrl+Enter (Cmd+Enter on Mac) |
| Toggle hide verified in views | H |
| Solo current label | S |
| Show all labels | Shift+S |
| Action | Shortcut |
|---|---|
| Focus label search box | Ctrl+F |
| Focus brush label input | Ctrl+L |
| Action | Shortcut |
|---|---|
| Toggle Show All 3D | Ctrl+3 |
| Action | Shortcut |
|---|---|
| Open File | Ctrl+O |
| Save Annotation | Ctrl+S |
| Zoom | Hold Cmd + Mouse Scroll |
| Undo | Ctrl+Z |
| Redo | Ctrl+Y |
- Multiple file annotation
- Automatic progress saving


Video 14: Batch Processing Features (Click to watch on YouTube)
- Overlap detection
- Completeness checking
- Statistical reports


Video 15: Annotation Quality Control (Click to watch on YouTube)
- ✅ 2D/3D Image Annotation
- ✅ AI-Assisted Segmentation (SAM, Efficient SAM)
- ✅ Text-to-Annotation Conversion
- ✅ Watershed Instance Separation
- ✅ 3D VTK Visualization
- ✅ Multi-format Export Support
- ✅ Slice Deletion for removing blank or misaligned volume slices
- 📊 Volume Data Analysis
- ✏️ Precise Mask Editing
- 📊 Batch Processing Support
- 🔄 Label Lifecycle Workflow (Proposed / Edited / Verified)
- 👁️ State-based Visibility (filter list, hide verified in views, solo mode)
- 🔍 Label Search by ID with jump-to-slice
- 🏷️ Current-slice Object Relabeling without changing other slices
- Laggy performance: Enable GPU acceleration and close unused windows
- Memory issues: Reduce the number of simultaneously open files
- Mask misalignment: Check voxel dimensions in TIFF metadata
- VTK viewer not loading: Ensure
vtkandPyQt5versions are compatible
- Inaccurate segmentation: Adjust click position, use manual editing for optimization
- Model loading failure: Check network connection and model file integrity
- Create annotation templates
- Set annotation rules
- Quality check procedures
- Image enhancement
- Format conversion
- Batch renaming
- GitHub Issues: Report bugs and feature requests
- Discussions: Share experiences and best practices
- Contributing Guide: Participate in project development
This version builds upon the original Labelme and integrates:
- VTK for 3D visualization
- cc3d for connected component analysis
- AI models for auto-segmentation
- Efficient SAM for fast segmentation
- Text-to-annotation capabilities
- Original Labelme Project
- SAM Model Paper
- VTK Documentation
- Electron Microscopy Image Processing Best Practices
🎉 Start using Cellable for professional cell organelle annotation!
For questions, check the tutorial videos or submit a GitHub Issue
pyinstaller --name=cellable ^
    --windowed ^
    --icon=labelme/icons/icon.ico ^
    --add-data "labelme/config/default_config.yaml;labelme/config" ^
    --add-data "labelme/icons;labelme/icons" ^
    --add-data "labelme/translate/*.qm;translate" ^
    --hidden-import=osam._models.yoloworld.clip ^
    --hidden-import=em_util ^
    --collect-all osam ^
    --collect-all PyQt5 ^
    --recursion-limit=5000 ^
    --clean ^
labelme/__main__.pyOn macOS, use PyInstaller to build Cellable.app, then package it with hdiutil into a double-click installable Cellable-macOS.dmg (drag to Applications). By default, only EfficientSAM (accuracy) model files are bundled to keep size down.
# Build .app + .dmg (creates conda env, installs deps, downloads models, bundles into app)
chmod +x scripts/build_macos_installer.sh
./scripts/build_macos_installer.sh
Optional size profiles:
# Default now: only EfficientSAM (accuracy) models
./scripts/build_macos_installer.sh

# Middle: EfficientSAM + SAM-B
CELLABLE_MODEL_BUNDLE=balanced ./scripts/build_macos_installer.sh

# Re-enable CellPose stack (torch/numba) if needed
CELLABLE_EXCLUDE_CELLPOSE=0 ./scripts/build_macos_installer.sh

# Small extra reduction via symbol stripping
CELLABLE_STRIP=1 ./scripts/build_macos_installer.sh
Output:
dist/Cellable.appdist/Cellable-macOS.dmg
Optional signing:
CODESIGN_IDENTITY="Developer ID Application: ..."— sign with developer certificateADHOC_SIGN=0— skip ad-hoc signing
- Install dependencies (one-time)
# macOS includes hdiutil; the build script uses conda for an isolated env
conda --version- One-click build (recommended)
chmod +x scripts/build_macos_installer.sh
./scripts/build_macos_installer.sh- Open and install
open dist/Cellable-macOS.dmg
# Drag Cellable.app to Applications- Verify models are bundled (optional)
find dist/Cellable.app -name '*.onnx' | head- "App can't be opened because it is from an unidentified developer" — Common when the app is not notarized. You can allow it in System Settings → Privacy & Security, or use
CODESIGN_IDENTITYto sign before distribution.