Suplemental resources for a Git tech talk for RIT's Society of Software Engineers. Big thanks to @kahliloppenheimer for teaching me advanced Git, and Rachel Carmena(@rachelcarmena) for creating How to Teach Git.
To walk through the Demo that goes with the talk, checkout the Demo folder
Git is a Distributed Version Control system. It runs across multiple devices on many platforms to allow teams and individuals to collaborate and track changes in a project. Typically, Git is used for programming poroject, but it works well with any text file based projects. Git was created by Linus Torvalds in 2005 who created it to help with maintaining Linux(Source). Today, Git has grown into one of the most widely used version control systems with heavy influence from the Free and Open Source Software movement.
For Mac and Windows systems, you can find installers for Git on their Downloads page
For Linux/Unix systems, there is a Git package for almost every distro. Find details about how to install for your distro here.
After installing Git, you may want to customize your git environment. Git maintains two configurations that control how it behaves, a global config for your development environment, and a local config that dictates one local repository on your computer. The local config only applies to your environment. Multiple people working in one repository will have different configs.
Git keeps track of your identity so that your work can be marked as contributed by you. To configure how Git refers to you, set the following configs:
git config --global user.name="Git Guru"
git config --global user.email="guru@git-scm.com"
A repository is a central location in which data is stored and managed [OED 1.2]
A repository is Git's root organizational structure for maintaining a project. It contains all of the files for the project, as well as information about the project's contributors, configuration, and change history. To create a repository on your computer, first set your working directory to be the folder you want to make a repo and run git init
mkdir myNewRepo
cd myNewRepo
git init
You'll notice that this creates a .git folder where you ran the command. This folder contains all of the information Git needs to work its magic. For most cases, you won't need to modify this folder at all. Instead, all work should be done in the same directory that contains the .git directory.
A remote is a repository that exists outside of your development environment. Typically, remotes are hosted on a dedicated Git server. If you use a service such as GitHub, BitBucket, or GitLab, they create a remote repository for you with the nececssary configurtions for remote development. You can also create a remote repository on your own server by running the command git init --bare.
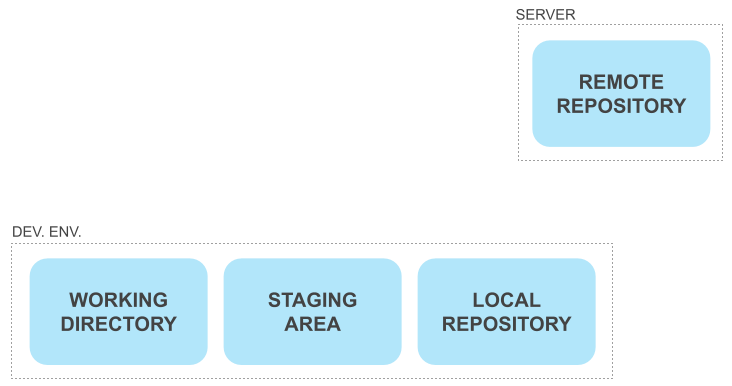
You can add a remote for an existing local repository with the command git remote add
git remote add name url
where name is the name you can refer to this remote locally and url is where the remote resides.
Incidentally, this is how the concept of Forking works. For example, if you wanted to Fork this repository without using GitHub's Fork button, you would use the following steps:
- Create a new repository on GitHub
- Clone this repo to your local machine
git clone https://github.com/smlevorse/GitTechTalk.git
- Add a remote pointing to your repository
git remote add myFork https://github.com/username/forkRepo.git
- Push the code up to your new fork
git push -u myFork master
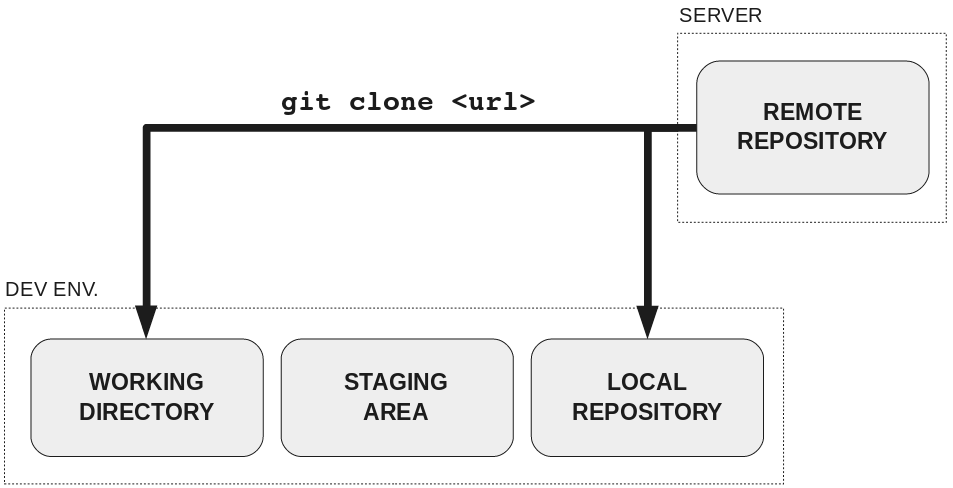
In Git, cloning is the act of copying a repository from some remote location to a local dev environment. When you run git clone, it creates a new copy of the repo, that is, you do not need to run git init before cloning. There are two methods for cloning a repo, depending on which protocol you want to use:
Over https:
git clone https://github.com/smlevorse/GitTechTalk.git
Over SSH:
git clone git@github.com:smlevorse/GitTechTalk.git
Typically https is easier to set up, but some companies may require you to use SSH.
After cloning a repo, a remote named origin is created by default that points to wherever you cloned from.
Most of the time, when using Git, you stick to the "Standard Workflow." That is, the mantra that most people use to teach Git, "Add, Commit, Push." Git allows for collaboration, but it doesn't have any sort of autosave functionality like Google Docs or Office 365 do. Instead, you must first tell Git which files to save (Add), then tell Git when you want to save (Commit), and finally share the saved changes with the rest of your collaborators (Push). The result is a the typical workflow that has been drilled into many developers' heads for years.
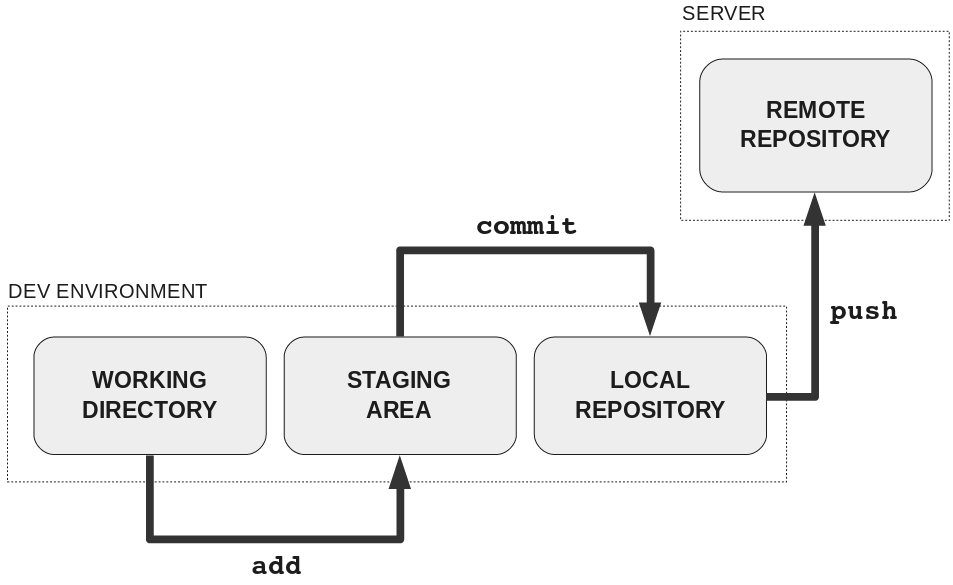
To understand how git actually works throughout this workflow, you need to understand the four locations where git operates:
- Working Directory: This is the directory and subdirectory that is on your filesystem. This is where you do work. Git is unaware of changes you make here until you tell it to check for changes.
- Staging Area: After making changes to files in the working directory, you tell Git to move those changes to the staging area. This acts as a place to organize what changes will and won't be used in the project.
- Local Repository: This is the repository where changes are tracked. Changes from staging get packaged up and sent here, maintaining a local version history.
- Remote Repository: Discussed above, this is where changes are maintained for the entire project.
Copies changes from the working directory to the staging area.
git add file.java
This command supports glob patterns. That is * and ** act as wildcards:
git add *.java
You can also use the -A flag to stage all changes
git add -A
After piecing together which files have changes that you want to commit, you can run git status to see a summary of any unstaged changes, or which changes have already been staged.
Once you have all of the changes that you want staged, you'll want to package them up so they can be referred to for future reference. This is done with the commit command. A commit is a snapshot of the state of the repository at a given time. Commits contain information including:
- What the difference between files from this commit and the last commit
- Who made those changes
- When the changes were committed
- A message describing what the changes are or why they were made
- A SHA hash acting as a unique identifier
- A reference to preview commits in the graph*
To create a commit, run:
git commit -m "A short meaningful description"
This packages up all of the changes staged in the staging area and updates the local repository with the new commit. After the commit is made, the local repository's history is updated to include the new commit. To see the history, run git log:
commit b5c9987185f5cff24010a5fdf230295e7589ba9d
Author: Sean Levorse <smlevorse@msn.com>
Date:   Thu Feb 7 11:44:46 2019 -0500

    Initial commit
By default, you'll see a list of commits including the SHA, the Author, the time the commit was made, and the commit's message. You can use the up and down arrows to navigate through the log. Press q to quit and return to the command line. The log has many useful flags for obtaining information about commit history. Check out the docs to see some of the powerful ways to leverage this tool.
*Commits are often visualized as nodes in a directed graph. Each commit points to one or more commits that typically lead back to the first commit in a repository. Visualizing commits this way makes it easy to see how project changes branch out and come together.
HEAD is a concept you will see come up frequently when working with Git, especially if you seek out help on sites like StackOverflow. To put it simply, HEAD always refers to the newest commit on the current branch. People often call it a "pointer to the tip of the current branch."
HEAD is a reference, and there are several other similar refernces, such as MERGE_HEAD that are relvant. But HEAD is the most common and it's worth mentioning here.
Frequently, HEAD is used in conjunction with Revision Selection. In git, the ~ and ^ characters can be used to refer to a commit's parent commits.
HEAD~ = The commit before the last commit
HEAD~2 = Two commits ago
HEAD~20 = 20 commits ago
The caret is more complicated, you can read more about revision selection here
Now that your changes have been made and committed to the local repository, you'll want to tell the remote repository about your changes so you can share them with your collaborators. This is done through the push command:
git push origin master
When pushing, you usually need to specify which remote and which branch to push to. If you want to set a default remote/branch for a local branch to push to, you can use the -u flag:
git push -u myFork master
git push will fail if the remote repository's history differs from the local repository's history in a way that doesn't make sense.
For the most part, if a push fails, it means that someone else has pushed changes while you were working. To fix this, see Fetch and Push below. There are a handful of cases where a force push is necessary. However, a force push is quite dangerous and can cause you to make unfixable changes resulting in the loss of work. Force pushes should be used sparingly, done with care, and by convention are NEVER done on the master branch. Force pushing is telling git "I know you think the history should look like this, but you're wrong, my history is the truth, use this instead." To force push, use:
git push -f
Mistakes happen. Bugs pop up. Experiments fail. To err is to human. But fortunately Git has your back. There are two useful commands that leverage the version control aspects of Git to rectify mistakes in the project.
Git reset sets files in your working directory to the status they were at a given point in time. By default, git reset resets the working directory to HEAD.
git reset --hard
will undo any local changes. The --hard tells git it can overwrite the working directory.
You can also reset individual files.
git reset --hard eac1380 README.md
git reset --hard eac1380
You can tell Git to reset the working directory to the state of a specific commit. Note, if you try to push from this point, the push will fail because the remote has commits the local repository does not.
This is where revision selection can be nice. If you know you want to reset to undo the last 3 commits, you can simply run
git reset --hard HEAD~3
Like reset, revert also returns the repository to a previous state. However, it does so by creating a new commit that undoes all of the changes between the current state and the desired commit. This allows you to return to a previous state without having to rewrite history. This means that the decision to undo certain changes is documented in the git history
Visually, the difference looks like this. Git reset looks like this:
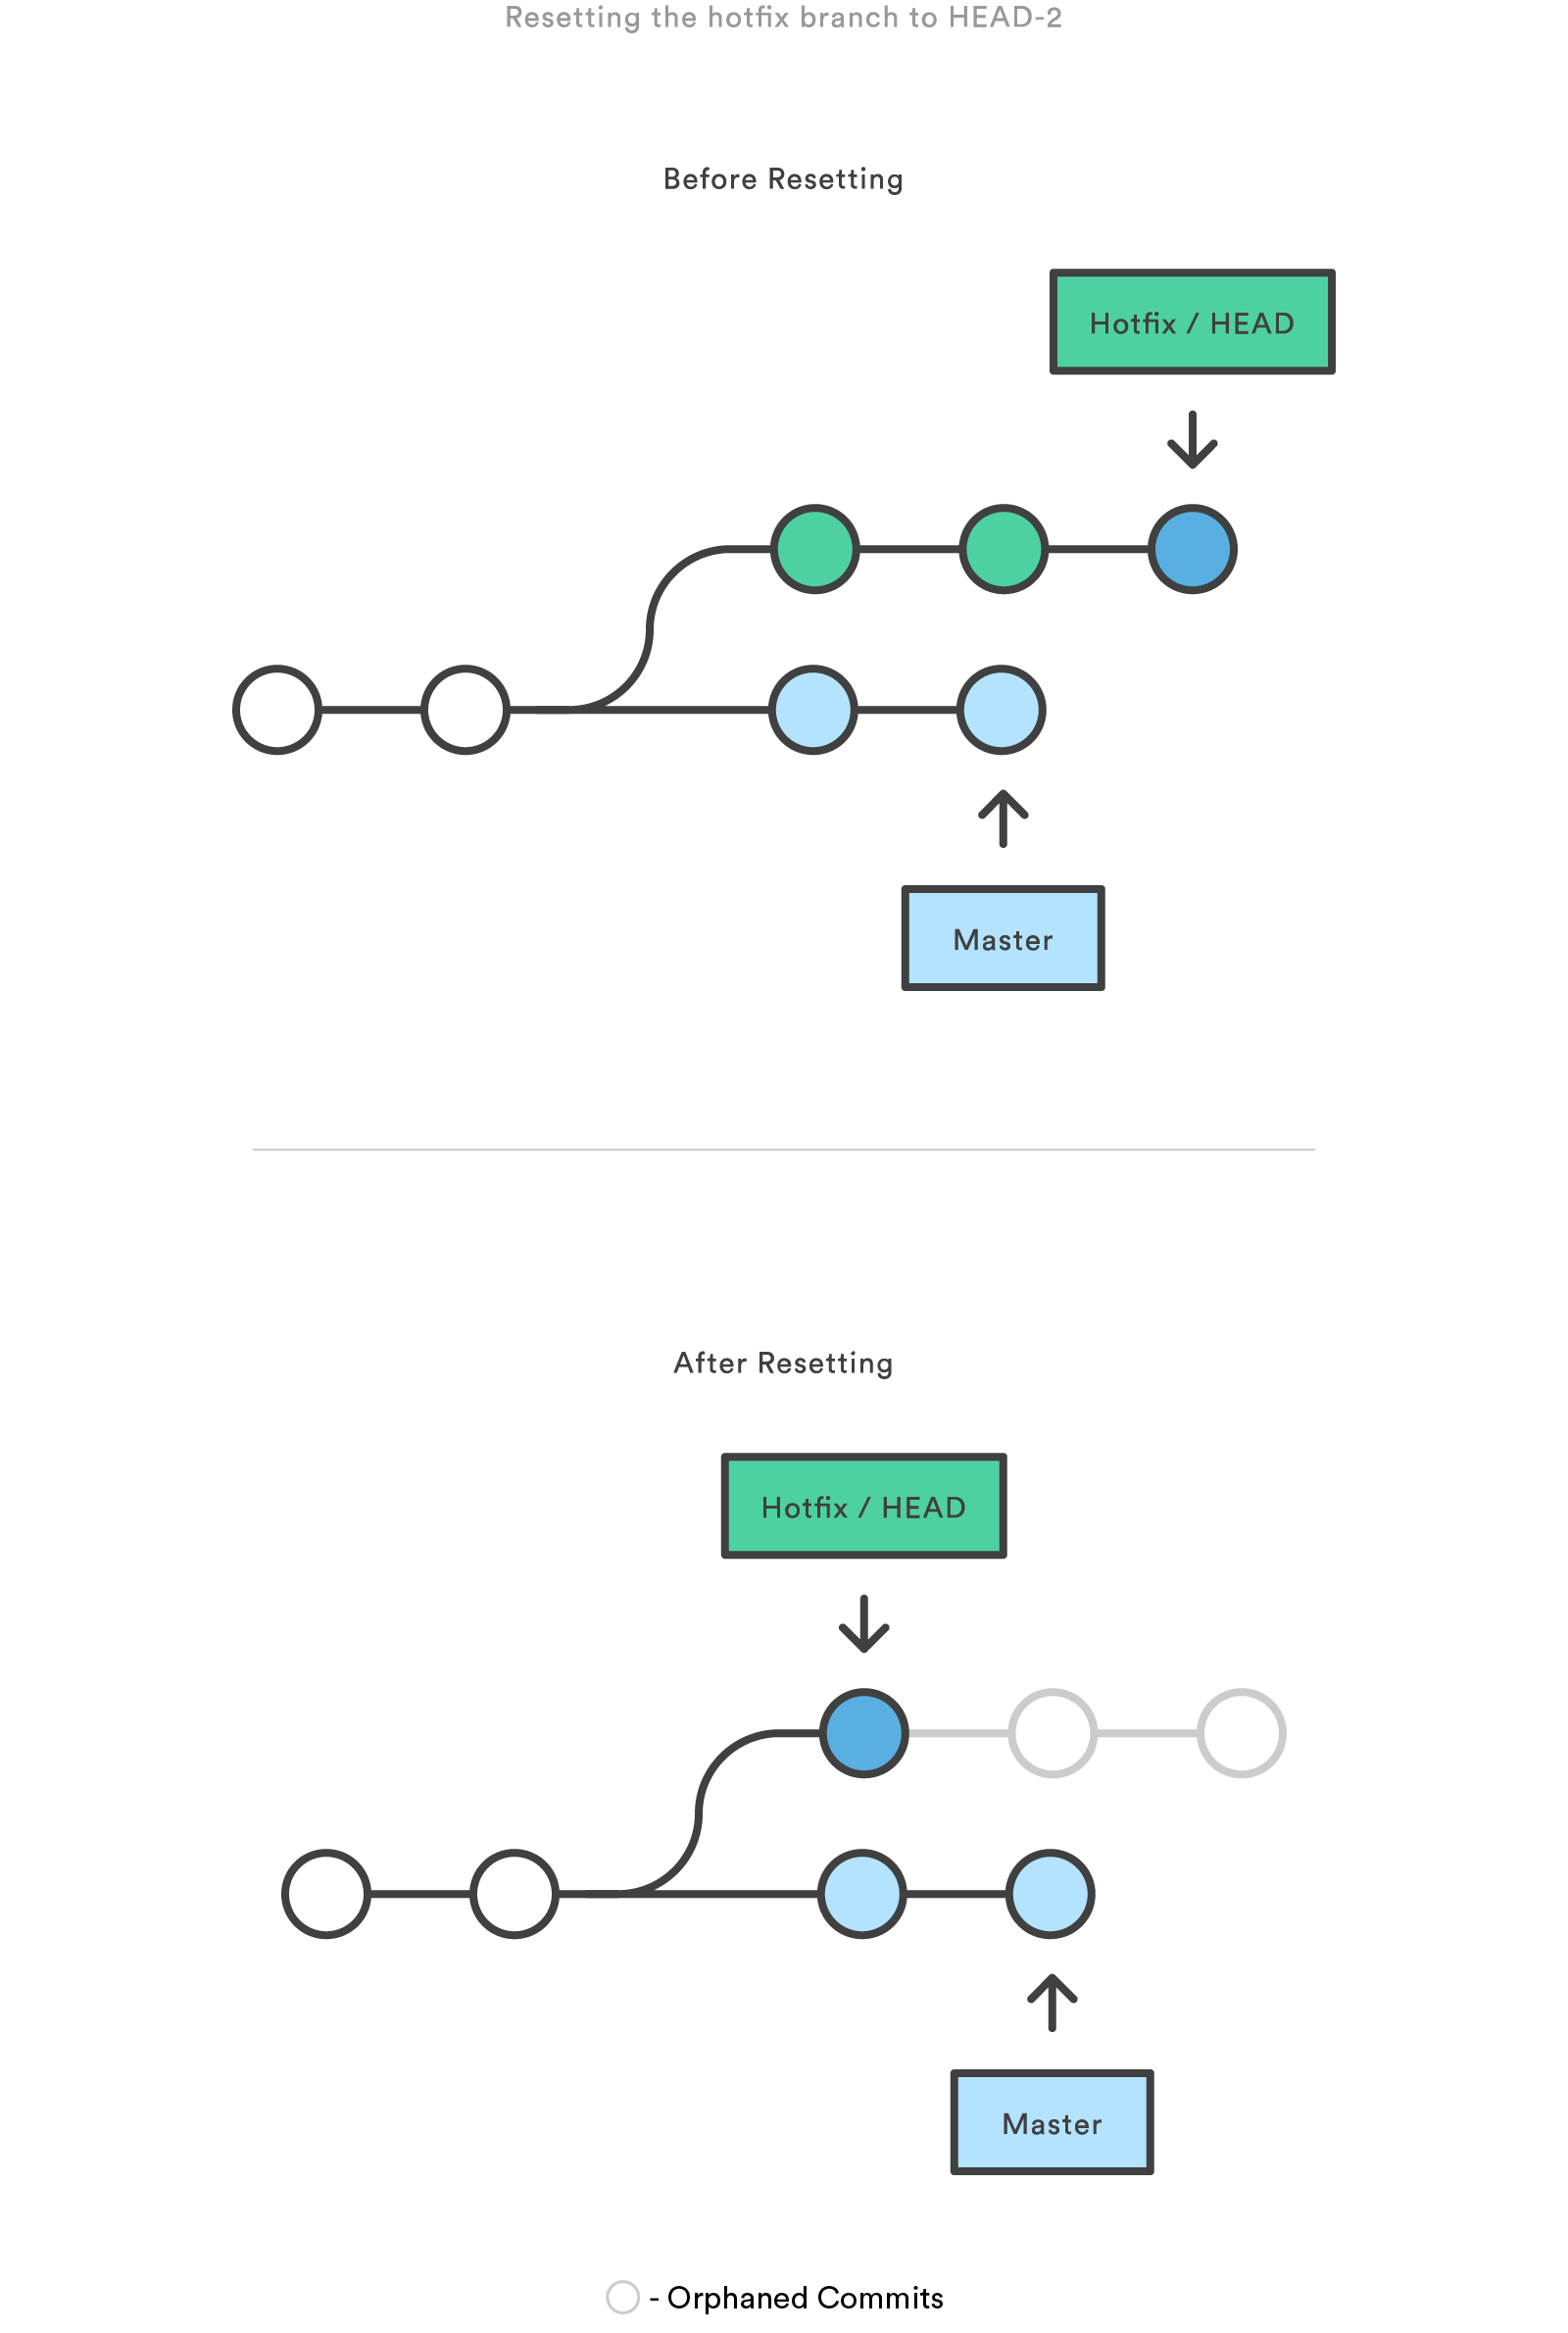
While Git revert looks like this:

(Credit Atlassian for the images)
In general, reset is used to undo local changes while revert is used to undo remote changes.

Fetch is used to update your local repository with changes from a remote that aren't incorporated into your local repository. It's worth noting here that a branch in your local repository and a branch in your remote repository with the same name are still considered separate branches.
Usage:
git fetch remotename
If you ommit the remote name, it will default to origin.
You can fetch multiple remotes at the same time:
git fetch origin myFork
Or you can fetch all remotes
git fetch --all
Fetching does not update your working directory. Git is aware of any updates, but they are not applied.
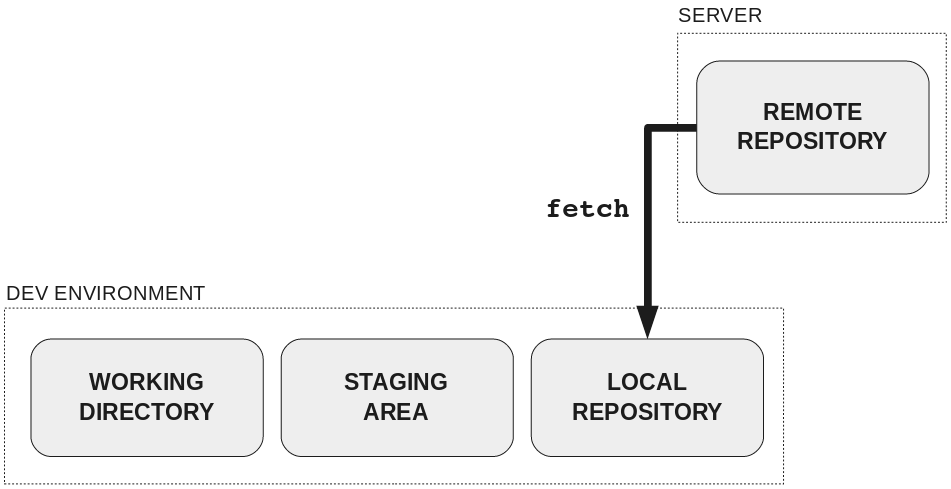
Git pull is the more popular option. It is functionally equivalent to fetch + merge (We'll talk about merge later on). This means that when you git pull, your working directory is updated as well to include any changes on your branch from remote that aren't in your working branch. Only the current active branch is merged.
git pull remotename
If you don't specify a remote, it will default to origin.
Since changes in your local directory might touch changes in the remote repository, it's possible that pulling gives you a merge conflict. You have three options:
- Deal with the merge conflict (see Merge Conflicts below):
This is the better option since it means you have the option to incorporate your changes and you aren't pushing the conflict off for later
- Force pull
git pull -f
This option overwrites whatever is in your repository, but it makes sure that you are up to date
- Abort the merge
git merge --abort
This option does not solve anythong other than the existing merge conflicts.
Additionally, there's an option to pull and rebase (rebasing is explained below). This is functionally equivalent to git fetch + git rebase:
git pull --rebase
Rebasing can be more involved, but may have the desired effect in the long run.
Some files you don’t want to commit to the remote. For example, JetBrains IDE's produce a .idea folder that often means nothing to the project. Git provides a way to denote files that it should not track. To do this, create a text file titled .gitignore. One .gitignore applies to the directory it is placed in and its children.
Each line of the file is a glob pattern of which files to ignore
Lines that start with # are comments
Must include the trailing / for directories
*.o
.idea/
id_rsa
Some IDEs will autogenerate a .gitignore appropriate for your project.
For help creating your own .gitignore, check out the documentation.
Sometimes you want to work on a large change that might take some time, involve several commits, and could intefer with other work on the project. This is where branching comes in. Brancing is the process of making changes on a separate sequence of commits from the main stream of commits (a.k.a. master).
The git branch command will list all available branches, and denote the current branch with an asterisk *. HEAD always points to the tip of the current branch.
$ git branch
  feature
* master
To create a branch:
git branch branchname
This creates a branch at the current commit HEAD is pointing to. However, this branch doesn't have any commits yet, it only exists as a potential branch. Any new commits will still be added to the old branch. To move to the new branch, use checkout.
You can also delete a branch with:
git branch -d branch-to-delete
The git checkout command switches to a new branch. HEAD gets moved to the target of the checkout command.
git checkout update-colors
Alternatively, if you want to create a new branch and switch to that branch in one command, use the -b flag:
git checkout -b update-colors
Additionally, you can checkout individual files from a branch:
git checkout master README.md
After checking out a single file, you can then stage it to be committed to the current branch.
Lastly you can checkout a commit instead of checking out the tip of a branch:
git checkout eac1380
Note: If you checkout a commit, you enter a state called a 'detached HEAD' state. What this basically means is HEAD isn't pointing to the tip of a branch. Any new commit here do not belong to any branch, however they will form their own untracked branched off of the commit that you checked out. Once you go back to the tip of a branch, this untracked branch can be garbage collected. To preserve these commits, run
git checkout -b newBranchName. This will create a new branch that is tracked by Git and contains the commits that were made to the detached HEAD
It's worth noting that if you have unstaged changes that will be overwritten by a checkout, Git will force to to either commit them or stash them before you are allowed to checkout. (Stashing is covered below)
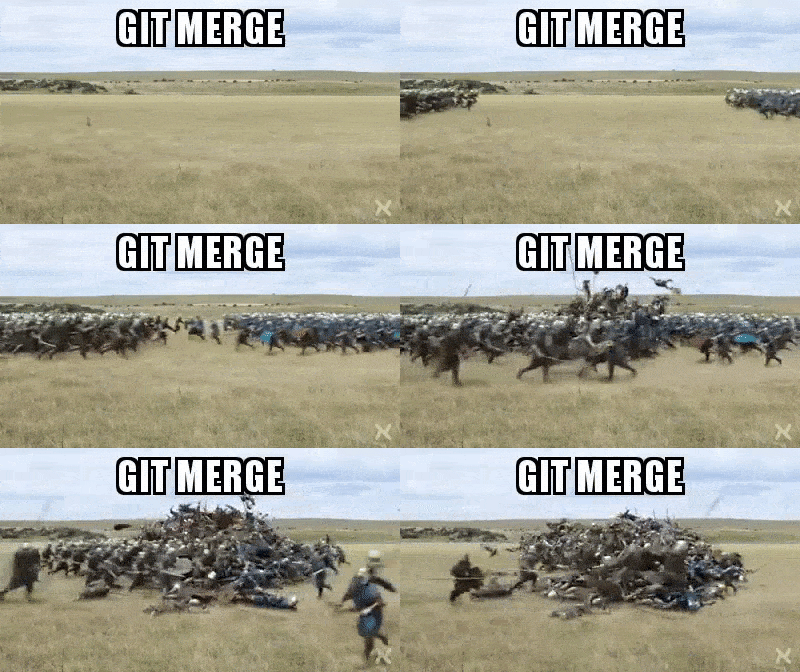
So now that you have your branch with changes on it, you'll want a way to merge those changes back into your master branch. You can merge any two branches with the git merge command. Merging works by creating a new commit with the changes from both branches that points back to the previous tips of both branches. This new commit is added to the branch that is currently checkout out. Technically, the other branch is not deleted and can continue to be used after the merge.
The to merge branchB into branchA, it would look like this:
git checkout branchA
git merge branchB
Mergin can be visualized like this
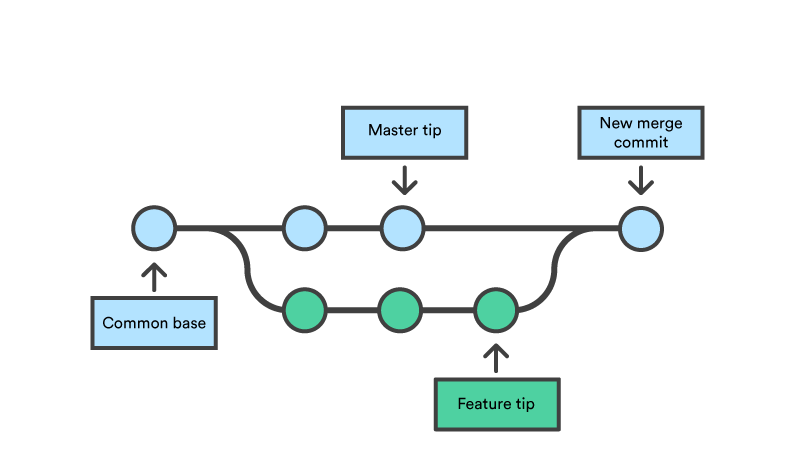
Now, there's a chance that some of the changes in both branches overlap. If this is the case, Git might not be able to merge. If this happens, you will encounter a merge conflict. They can be overwhelming at first, but you get used to understanding the best way to manually merge files.
When a merge conflic occurs, you'll notice that Git will replace some of the lines in your files with its own stuff. These are the lines where the merge conflicts occur. Once a conflict occurs, run git status to see which files have conflicts. Merge conflicts look like this:
# myFile.txt
here's some lines
...
<<<<<<< HEAD
This is a line that someone added to the master branch
=======
This is a line I added in my feature branch
>>>>>>> The commit message from my last commit
the rest of the file is here
Notice how it is untouched by Git
Merge conflicts are easy to spot because of the distinctive seven less-thans, greater-thans, and equals-signs. This is where you have to use your brain to manually merge the conflict. Sometimes it's as simple as keeping one of the changes. Other times you'll want to find a way to incorporate both changes. In the end, you'll probably want to delete the lines with the greater-thans, less-thans, and equals.
Once you resolve the conflicts in your files (or if you just want git to stop yelling at you), simply stage the files that have conflicts with git add and continue with the merge:
git add -A
git merge --continue
Additionally, you can use a built in merging strategy to mitigate the number of merge conflicts you encounter.
git merge feature --strategy=ours
This line will merge the feature branch, but discard any changes in feature that conflict with our branch.
git merge feature --strategy=theirs
This line will merge the feature branch, and discare any changes in our branch that cause conflicts.
There is a multitude of merging strategies available. Check out the doc to learn more.
Rebasing is the act of changing which commit on a separate branch the current branch is based on. Remember that when you create a new branch, commits to the old branch are not integrated into the new branch. This creates two parallel histories that are equivalent before the branch. Rebasing allows you to merge changes from the base branch into the feature branch without merging those changes into the base branch. This is useful for long running feature changes that aren't done yet, but still need changes from other parts of the project.
Visually, rebasing takes a history that looks like this:

And creates new commits that result in this:

Rebasing often limits the number of merge conflicts that arise when eventually merging the feature branch back to the base branch
So how do we rebase?
git checkout feature
git rebase master
This command sequence unwinds all of the commits on feature, starts at the tip of master, and replays the commits from feature onto the fresh branch. Merge conflicts can still occur while rebasing. However, when rebasing, merge conflicts arise commit by commit. So you may fix the merge conflicts for one commit, continue the rebase, and encounter more merge conflicts. However, by using rebase, the merge conflicts happens in a more conceptually sequential order which can often be easier to work through.
Like with merging, when you encounter a merge conflict, you must resolve the conflicts in your files, stage the changes with git add, and then run
git rebase --continue
to continue with the rebase.
Rebase also allows you to specify a merge strategy:
git rebase master --strategy=ours
However, keep in mind that "ours" refers to the base branch and "theirs" refers to the feature branch.
Another useful tool is rebase interactive. Rebase interactive allows you to modify the commits as they get reapplied. To start an interactive rebase, add the -i flag to your rebase command.
git rebase master -i --strategy=ours
Typically, this is actually done by rebasing onto another commit:
git rebase 025ead7 -i
After running this command, your default text editor will pop up, prompting you with the commits that will be replayed during the rebase
pick a4b1f72 Created file for examples
pick c5f793c Added information about Checkout
Here, each line represents the commands that are run from top to bottom. You can re-order the commits if you so please. You can even insert shell commands between commits! If you remove a line, that commit will be deleted. By default, each commit starts with the pick command. However, you can change this to be any of the following
pickorp- Keep this commitrewordorr= keep this commit, but edit the commit messageeditore= keep this commit, but stop for amendingsquashors= keep the changes from this commit, but add them into the last commit and merge their messagesfixuporf= like "squash", but discard this commit's log messageexecorx= run command (the rest of the line) using shelldropord= remove commit
Make the changes to the file, save, and close your text editor to begin the interactive rebase.
For the case of reword, when the rebase reaches that commit, your text editor will open again to get the new commit message.
For the case of edit, the rebase will pause and allow you to run git commit --ammend commands or make changes to the working directory. Run git rebase --continue to continue.
Typically, this is used to compress a bunch of related commits into one single, organized commit:
p eac1380 Created my awesome new feature
f 8d8a9d5 Whoops, found a bug
f 393dff4 and another
f 0902440 oops, please ignore
f a4b1f72 think I got it this time
f 19453bc I was wrong
f 15fb666 So close
f 87394d7 almost there
f c5f793c dagqaiethnkjfdn
f 025ead7 FINALLY
After the rebase, all of these commits that tell a wonderful journey of toil and strife get squashed down to one single commit:
commit eac1380c73f8a47d6475ead014aaa61dc0a7abf5
Author: Sean Levorse <smlevorse@msn.com>
Date:   Tue Feb 12 11:36:06 2019 -0500

    Created my awesome new feature
Note: After rebasing, it is likely that the commit history on your local machine does not match the commit history in the remote repository. This is where
git push -fcomes in handy.
Sometimes you've committed, but then realize that you forgot to stage one file. Or that you forgot to make one small change. Git lets you sneak in unnoticed and make those quick fixes without having to create a new commit.
If you want to add changes to the last commit:
git add -A
git commit --ammend --no-edit
The --no-edit flag means that you don't want to modify the commit message. You can also simply modify the last commit's message by ommitting this flag and not staging any changes. This is also useful for changing the log message for merge commits.
Sometimes you have files that are modified in your working directory, but you need to switch over to a different branch for a second. The checkout command doesn't let you change branches if you have uncommitted changes, but you're not ready to commit your work. To get around this, use git stash. The stash is a stack of psuedo-commit like changes that you are saving for later.
For example, lets say you've modified some files:
$ git checkout master
error: Your local changes to the following files would be overwritten by checkout:
        myProject.c
Please commit your changes or stash them before you switch branches.
Aborting
$ git stash
Saved working directory and index state WIP on my-branch: 34b6ccb .
HEAD is now at 34b6ccb
$ git checkout master
Switched to branch 'master'
Everything up to date.
$
At this point, your changes have been stashed, which allows you to freely switch to another branch. Once you're done and want to return back to your stashed work, simply return to that branch and run
git stash pop
If you stash a lot of changes over a short period, it may get confusing which changeset you want to pop. You can see which changes belong to which branges with
$ git stash list
stash{@0}: WIP on my-branch: 34b6ccb .
stash{@1}: WIP on toms-branch: 6f8a0cb .
stash{@2}: WIP on my-branch: 98de8c1 .
stash{@3}: WIP on cool-feature-bro: 93be4af .
Once you know which work in progress you want to pop, you can use
git stash pop stash{@1}
to specify which changeset to pop.
You can also remove changes from the stash with git stash drop, or clear the entire stash with git stash clear
Sometimes you want to delete a file. Instead of deleting it from your directory using your operating system, use git rm filename. This stages the file for deletion in the next commit.
Git has a tool to let you compare changes in your working directory to the local directory:
git diff
You can also compare branches:
git diff branch1..branch2
You can compare a specific file
git diff filename
The tool is really powerful. The documentation is pretty verbose, so I recommend Atlassian's tutorial
Sometimes you want to incorporate changes from a different branch without merging the entire brach. Cherry Picking is the act of copying changes from a single commit onto a branch.
git cherry-pick 5b95470
This will take all of the changes from 5b95470 and create a new commit with the exact same changes on the current branch.
This is useful for:
- Sandboxing changes on a different branch
- Recovering corrupted branches
- Manually merging selected changes
Practice!

If command lines aren't your thing