This article discussed the following topics,
- How to use AI coder, especial Google gemini-cli and Alibaba qwen3-coder to generate Blender python scripts,
- How to configurate camera's properties and control its movement,
- How to generate mp4 video clip via Blender.
We use Google's gemini-cli and Alibaba's qwen3-coder to help us to learn and to use Blender python. Both gemini-cli and qwen3-coder are poweful, easy to use, and cheap.
Using the gemini-cli and qwen3-coder, we can easily do the following,
- Write Blender python script and even an entire project from scratch,
- Fix bugs,
- Add more functionality to an existent script.
Following prompts illustrate how to instruct the gemini-cli and qwen3-coder to do the 3 tasks.
# 1. Write Blender python script and even an entire project from scratch
> In Blender python, how many properties that a camera has, and how to use them. Please give me a sample python script.

# 2. Fix bugs
> In @/home/robot/movie_blender_studio/camera_properties.py, line 32, "camera.data.cycles.panorama_type = 'EQUIRECTANGULAR'  # 全景类型", when running it, it throws exception "AttributeError: 'Camera' object has no attribute 'cycles'". Can you fix the bug?

# 3. Add more functionality to an existent script
> Please modify the python script @/home/robot/movie_blender_studio/camera_focus_cube.py, so that when the script controls the camera movement in Blender, it also generate a mp4 video recording the view of the camera.
We use qwen3-coder to generate a Blender python script, modify it, and fix bugs, so that the script can do the following tasks,
- How to configurate camera's properties and control its movement,
- How to generate mp4 video clip via Blender.
The Blender python script camera_focus_cube.py, is well annotated.
There are two ways to run the script.
# 1. Activate the conda env, so that all packages are available to use.
robot@robot-test:~/movie_blender_studio$ conda activate tripoSG

(tripoSG) robot@robot-test:~/movie_blender_studio$ ls
animation_rendering_mp4.py  blender_animations  blender_camera.py  camera_focus_cube.py  camera_properties_animation.py  camera_properties.py  hdri_rendering_image.py

(tripoSG) robot@robot-test:~/movie_blender_studio$ python3 camera_focus_cube.py
设置第 1 帧的相机位置: (-9.80, -5.00, 3.00)
设置第 2 帧的相机位置: (-9.60, -5.00, 3.00)
...
设置第 100 帧的相机位置: (10.00, -5.00, 3.00)
开始渲染动画视频...
Fra:1 Mem:18.09M (Peak 19.17M) | Time:00:00.08 | Syncing Cube
Fra:1 Mem:18.12M (Peak 19.17M) | Time:00:00.09 | Syncing Light
Fra:1 Mem:18.12M (Peak 19.17M) | Time:00:00.09 | Syncing Camera
Fra:1 Mem:18.12M (Peak 19.17M) | Time:00:00.09 | Syncing Target
Fra:1 Mem:18.12M (Peak 19.17M) | Time:00:00.09 | Rendering 1 / 64 samples
Fra:1 Mem:18.13M (Peak 19.17M) | Time:00:00.10 | Rendering 26 / 64 samples
Fra:1 Mem:18.13M (Peak 19.17M) | Time:00:00.10 | Rendering 51 / 64 samples
Fra:1 Mem:18.13M (Peak 19.17M) | Time:00:00.11 | Rendering 64 / 64 samples
Append frame 1
Time: 00:00.23 (Saving: 00:00.06)
...
Fra:100 Mem:18.13M (Peak 22.82M) | Time:00:00.00 | Syncing Cube
Fra:100 Mem:18.13M (Peak 22.82M) | Time:00:00.00 | Syncing Light
Fra:100 Mem:18.13M (Peak 22.82M) | Time:00:00.00 | Syncing Camera
Fra:100 Mem:18.13M (Peak 22.82M) | Time:00:00.00 | Syncing Target
Fra:100 Mem:18.13M (Peak 22.82M) | Time:00:00.00 | Rendering 1 / 64 samples
Fra:100 Mem:18.13M (Peak 22.82M) | Time:00:00.00 | Rendering 26 / 64 samples
Fra:100 Mem:18.13M (Peak 22.82M) | Time:00:00.00 | Rendering 51 / 64 samples
Fra:100 Mem:18.13M (Peak 22.82M) | Time:00:00.00 | Rendering 64 / 64 samples
Append frame 100
Time: 00:00.03 (Saving: 00:00.01)

渲染完成!视频已保存到: ./blender_animations/camera_movement.mp4
Once finishing the execution, a mp3 video clip is generated. The content of the mp3 video clip is the view of the moving camera.
- Start the Blender 3D tool
$ which blender
/home/robot/blender-4.4.3-linux-x64/blender

$ blender
Reloading external rigs...
Reloading external metarigs...
[INFO ] services.locationservice ...............: Not adding link to MakeHuman user data, since neither explicit path nor auto-discovery is set in preferences.
[INFO ] mpfb.init ..............................: Build info 20250419
[INFO ] mpfb.init ..............................: MPFB initialization has finished.
INFO: Ucupaint 2.3.2 is registered!
register_class(...):
Info: Registering operator class: 'OBJECT_OT_AlignOperator', bl_idname 'object.align' has been registered before, unregistering previous
bl_ext.user_default.Modifier_List_Fork: Registered 62 classes
INFO: Ucupaint update routine is done in 0.13 ms!
-
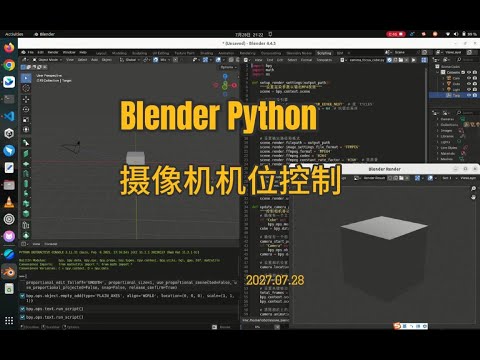
Load and run the script in Blender


As shown in the left screenshot above, take the following 3 steps to load the python script to the Blender 3D tool,
- Click the "Scripting" on the Blender top horizontal menu,
- Click the "Open" button on the scripting panel,
- Select the script, e.g. "camera_focus_cube.py", and open it.
As shown in the right screenshot above, take the following 3 steps to run the python script in the Blender 3D tool,
-
Change the rendering engine to "scene.render.engine = 'BLENDER_EEVEE_NEXT'", The reason is that the python engine embedded in the Blender 3D tool, its version is different from the Blender python library (bpy) used in the ubuntu terminal.
-
Click the triangle icon to run the python script,
-
If you want to change the view of the cube and the camera, click the left mouse button and drag it.
Notice that,
-
It takes several minutes to finish the rendering and the generation of the video clip. During this process the Blender 3D tool responds very slowly, and cannot be terminated.
-
In case you want to terminate the Blender 3D tool, you can "kill -9 " in another terminal.